前言
一直没有系统的学习HTML,CSS,JS都是东学一点,西学一点,想着暑假得空,便系统的学习下吧,故于此记录之。
2020.2.25更新:由于本专业开设了《web应用开发》课,于是乎本文档得到了进一步完善。
HTML
超文本标记语言(HyperText Markup Language,简称:HTML)是一种用于创建网页的标准标记语言。
您可以使用 HTML 来建立自己的 WEB 站点,HTML 运行在浏览器上,由浏览器来解析。
1 编译器
个人喜欢VS Code,简单,方便,有很多好用的插件
VS Code:https://code.visualstudio.com/
使用方法:
新建一个HTML学习文件夹后,用VS Code 打开,在文件夹中新建index.html文件,输入!再按Tab键,得到最基础的HTML
2 基础
HTML 最基本元素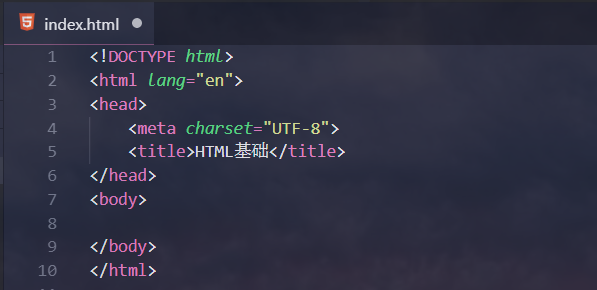
<!DOCTYPE html> 声明为 HTML5 文档
<html> 元素是 HTML 页面的根元素
<head> 元素包含了文档的元(meta)数据,如 <meta charset="utf-8"> 定义网页编码格式为 utf-8。
<title> 元素描述了文档的标题
<body> 元素包含了可见的页面内容
HTML 注释<!---->
<!--这是一个注释-->

注释在源码中才能看到
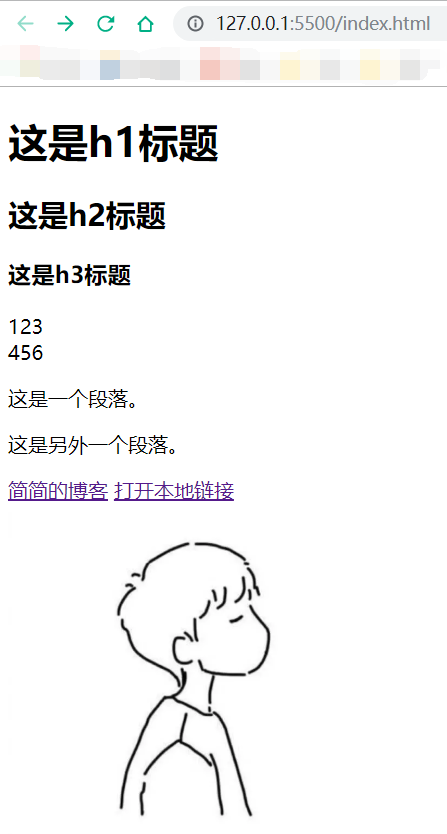
HTML 标题 <h1> - <h6>
<h1>这是h1标题</h1>
<h2>这是h2标题</h2>
<h3>这是h3标题</h3>
HTML 换行 <br/>
123<br/>456
HTML 段落 <p>
<p>这是一个段落。</p>
<p>这是另外一个段落。</p>
HTML 链接 <a>
<a href="https://jwt1399.top">简简的博客</a>

<a href="eg.html" target="_blank">打开本地链接</a>
target="_blank":从新的窗口打开
HTML 图像 <img>
<img src="/images/logo.png" width="304" height="304" />
上方标签演示:
3 样式
外部样式表:(存在于head)
<link rel="stylesheet" type="text/css" href="mystyle.css">
mystyle.css
h1{
    color:red;
}
内部样式表:(存在于head)
<style type="text/css">
        p{
        color:aqua
        }
    </style>
内联样式表:
<a href="https://jwt1399.top" style="color:aquamarine">点击我跳转到简简的博客</a>
4 链接
文本链接:(点击文字跳转到指定链接)
<a href="https://jwt1399.top" >点击我跳转到简简的博客</a>
图片链接:(点击图片跳转到指定链接)
<a href="https://jwt1399.top" ><img src="logo.png" width="100px" height="100px" alt="这是一个logo"></a>
<!--alt:图片加载失败显示的文字-->
文档内链接:(例如跳转到页面底部)
<a name="tips">hello</a><!--换行是为了更好演示效果-->
    <br/><br/><br/><br/><br/><br/><br/><br/><br/><br/><br/><br/><br/><br/><br/><br/><br/><br/><br/>
    <br/><br/><br/><br/><br/><br/><br/><br/><br/><br/><br/><br/><br/><br/><br/><br/><br/><br/><br/>
    <br/><br/><br/><br/><br/><br/><br/><br/><br/><br/><br/><br/><br/><br/><br/><br/><br/><br/><br/>
<a href="#tips">跳转到hello</a>
超链接伪协议:链接到电话、短信、邮件
<a href="tel:110" >请电话联系警察叔叔</a>
<a href="sms:110" >请短信联系警察叔叔</a>
<a href="mailTo:110@sina.com" >请Email联系警察叔叔</a>
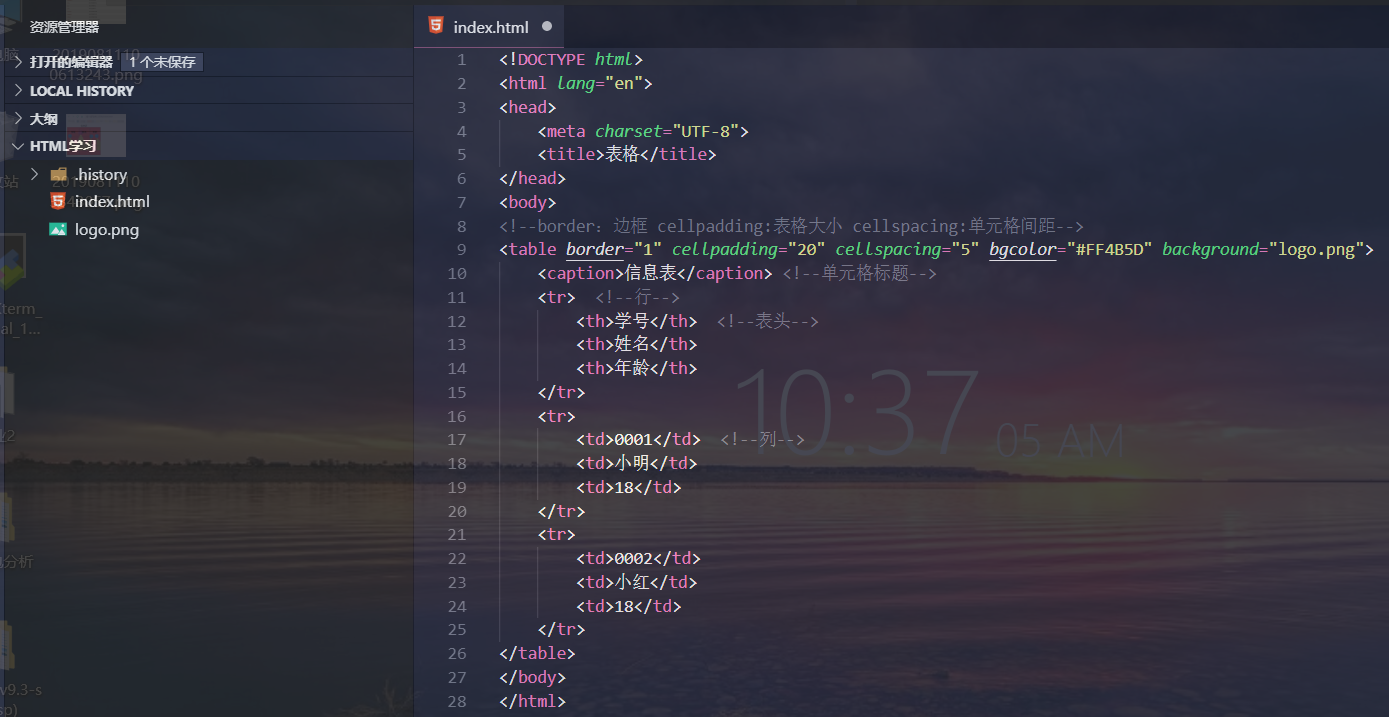
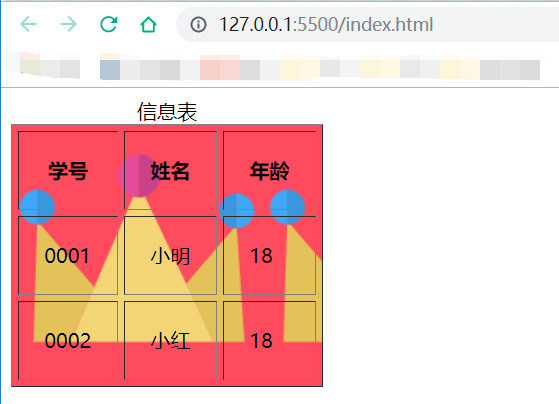
5 表格
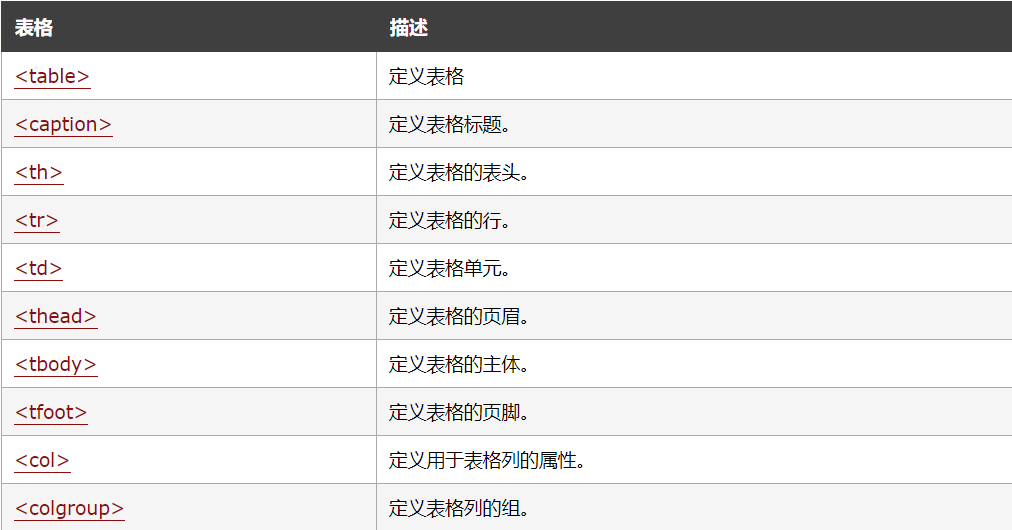
<!--border:边框 cellpadding:表格大小 cellspacing:单元格间距-->
<table border="1" cellpadding="20" cellspacing="5" bgcolor="#FF4B5D" background="logo.png">
        <caption>信息表</caption> <!--单元格标题-->
        <tr>  <!--行-->
            <th>学号</th>  <!--表头-->
            <th>姓名</th>
            <th>年龄</th>
        </tr>
        <tr>
            <td>0001</td>  <!--列-->
            <td>小明</td>
            <td>18</td>
        </tr>
        <tr>
            <td>0002</td>
            <td>小红</td>
            <td>18</td>
        </tr>
    </table>
上方标签演示:
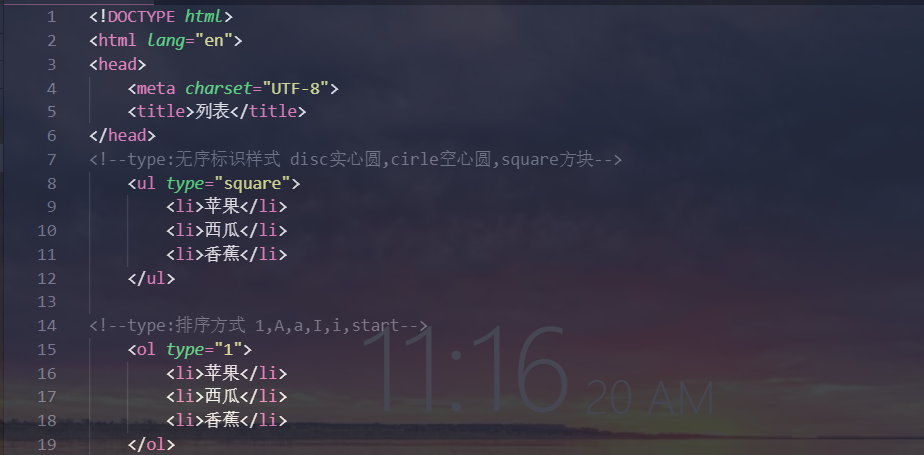
6 列表
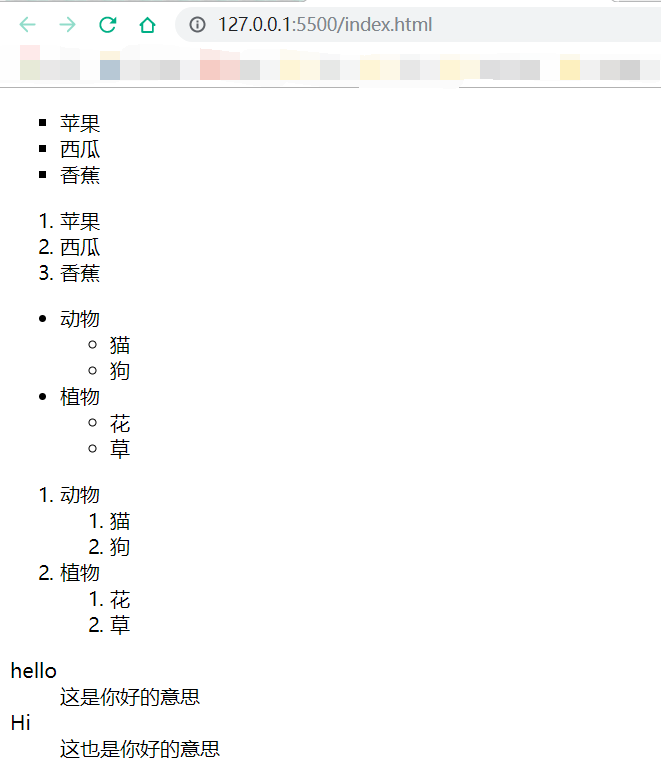
无序列表:
<!--type:无序标识样式 disc实心圆,cirle空心圆,square方块-->
    <ul type="square">
        <li>苹果</li>
        <li>西瓜</li>
        <li>香蕉</li>
    </ul>
有序列表:
<!--type:排序方式 1,A,a,I,i,start-->
    <ol type="1">
        <li>苹果</li>
        <li>西瓜</li>
        <li>香蕉</li>
    </ol>
嵌套列表:
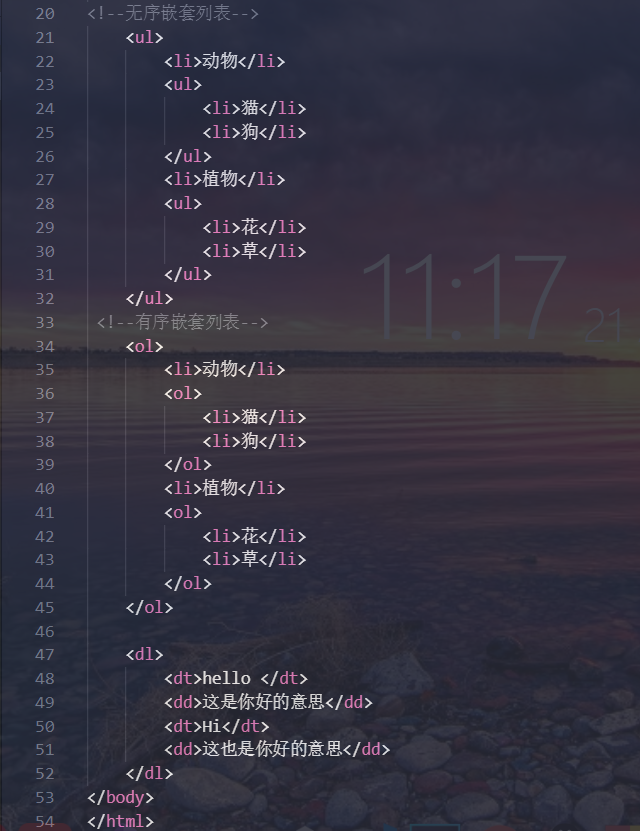
<!--无序嵌套列表-->
    <ul>
        <li>动物</li>
        <ul>
            <li>猫</li>
            <li>狗</li>
        </ul>
        <li>植物</li>
        <ul>
            <li>花</li>
            <li>草</li>
        </ul>
    </ul>
 <!--有序嵌套列表-->
    <ol>
        <li>动物</li>
        <ol>
            <li>猫</li>
            <li>狗</li>
        </ol>
        <li>植物</li>
        <ol>
            <li>花</li>
            <li>草</li>
        </ol>
    </ol>
自定义列表:
<dl>
        <dt>hello </dt>
        <dd>这是你好的意思</dd>
        <dt>Hi</dt>
        <dd>这也是你好的意思</dd>
</dl>
上方标签演示:
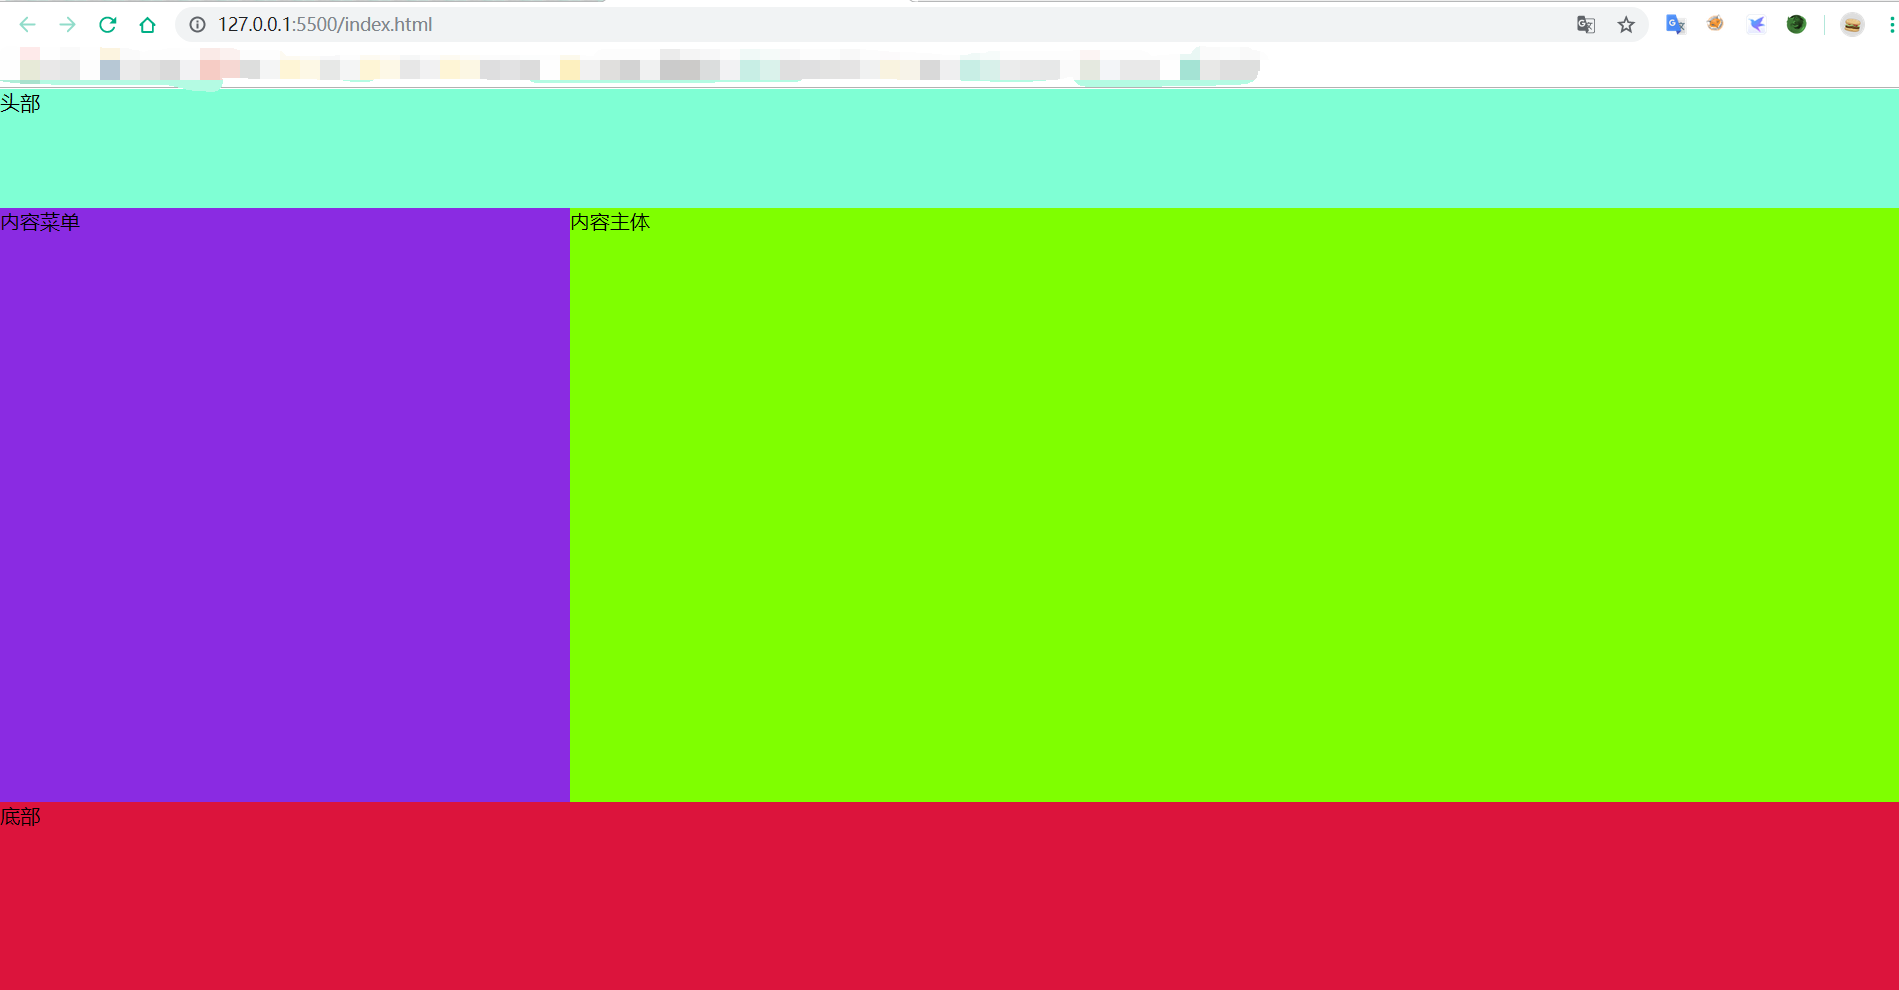
7 布局
<div> </div><table> </table>
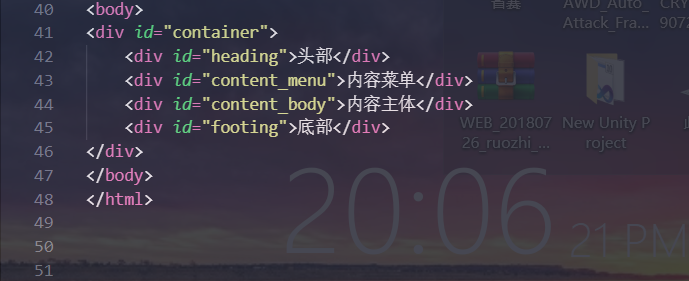
div布局:
<body>

<div id="container">
    <div id="heading">头部</div>
    <div id="content_menu">内容菜单</div>
    <div id="content_body">内容主体</div>
    <div id="footing">底部</div>
</div>

</body>
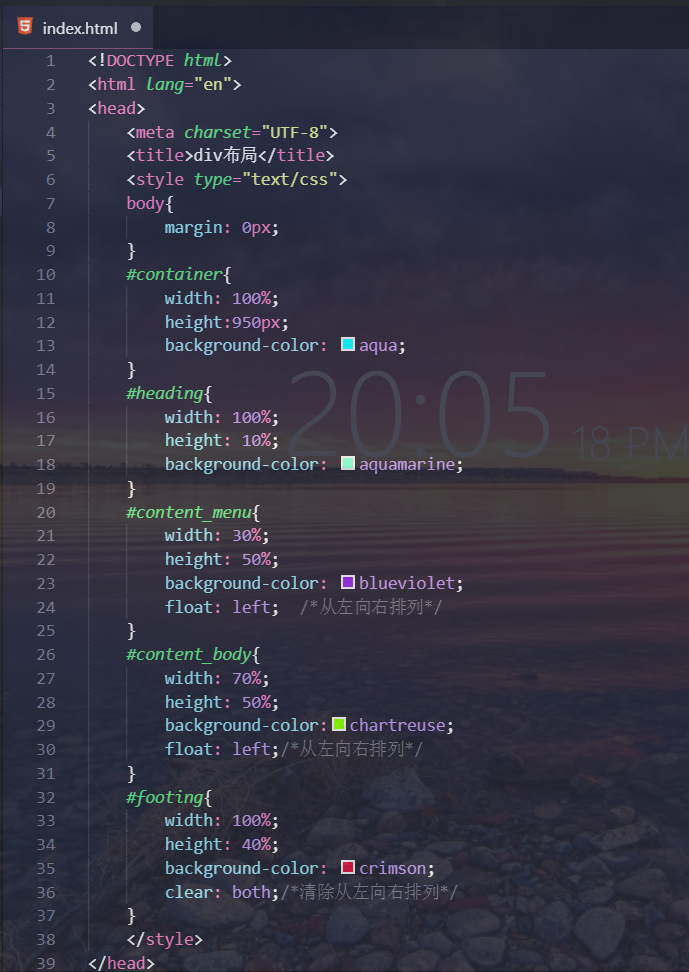
div样式设计:
<head>
    <meta charset="UTF-8">
    <title>div布局</title>
    <style type="text/css">
    body{
        margin: 0px;/*去除边框*/
    }
    #container{
        width: 100%;
        height:950px;
        background-color: aqua;
    }
    #heading{
        width: 100%;
        height: 10%;
        background-color: aquamarine;
    }
    #content_menu{
        width: 30%;
        height: 80%;
        background-color: blueviolet;
        float: left;  /*从左向右排列*/
    }
    #content_body{
        width: 70%;
        height: 80%;
        background-color:chartreuse;
        float: left;/*从左向右排列*/
    }
    #footing{
        width: 100%;
        height: 10%;
        background-color: crimson;
        clear: both;/*清除从左向右排列*/
    }
    </style>
</head>
上方标签演示:
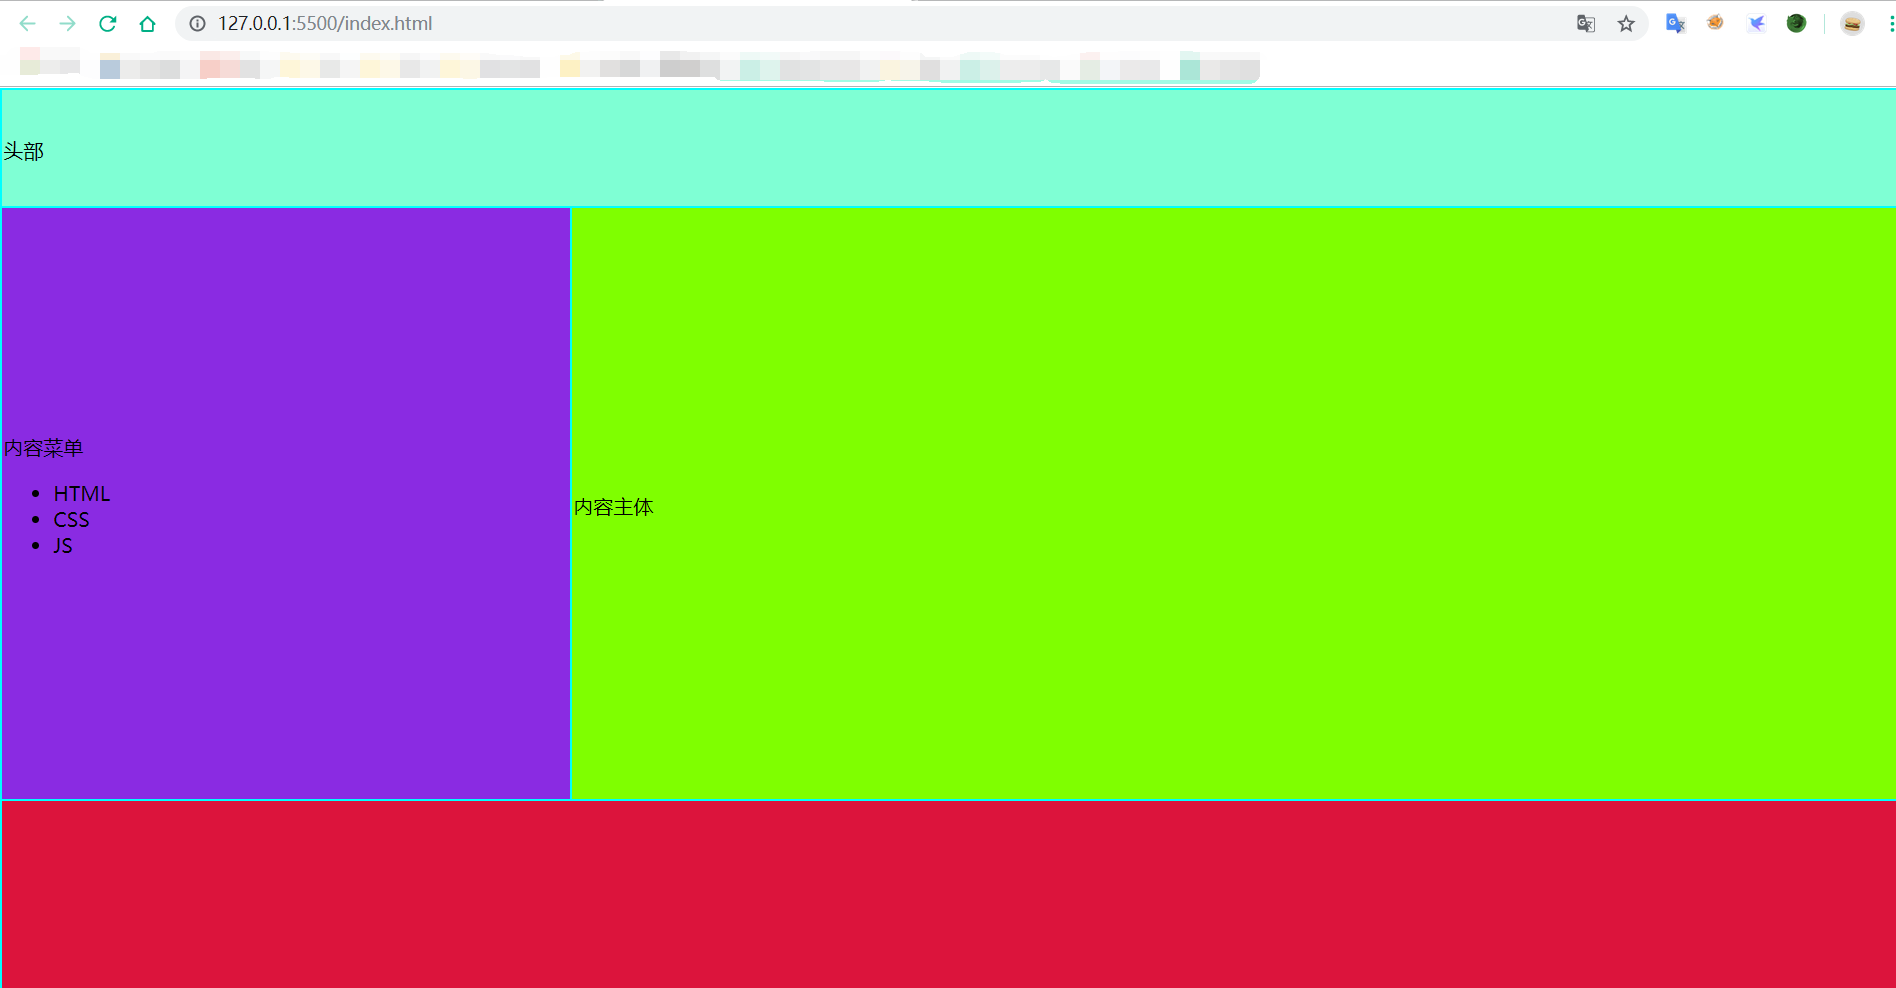
table布局:
<body marginheight="0px" marginwidth="0px">  <!--去除边框-->
    <table width="100%" height="950px" style="background-color:cyan">
        <tr><!--colspan="2":合并左右两个单元格-->
            <td  colspan="3" width="100%" height="10%" style="background-color: aquamarine">头部</td>
        </tr>
        <tr>
            <td width="30%" height="50%" style="background-color: blueviolet">内容菜单
            <ul>
                <li>HTML</li>
                <li>CSS</li>
                <li>JS</li>
            </ul>
            </td>
            <td width="70%" height="50%" style="background-color: chartreuse">内容主体</td>
        </tr>
        <tr>
            <td colspan="3" width=100% height="40%" style="background-color: crimson">底部</td>
        </tr>
    </table>
</body>
上方标签演示:
8 基础表单
<form> </form>表单用于搜集不同类型的用户输入
语法:
<form name="表单名" method="get/post" action="表单发往地">
   <input type=" " name=" " />
</form>
| 属性 | 说明 |
|---|---|
| type | 指定元素的类型。 |
| name | 指定表单元素的名称。 |
| value | 元素的初始值。type 为 radio时必须指定一个值。 |
| size | 指定表单元素的初始宽度。 |
| maxlength | type为text 或 password 时,输入的最大字符数。 |
| checked | type为radio或checkbox时,指定按钮是否是被选中。 |
| type基础属性值 | 描述 |
|---|---|
| button | 定义可点击按钮。 |
| checkbox | 定义复选框。 |
| file | 定义输入字段和 “浏览”按钮,供文件上传。 |
| hidden | 定义隐藏的输入字段。 |
| image | 定义图像形式的提交按钮。 |
| password | 定义密码字段。该字段中的字符被掩码。 |
| radio | 定义单选按钮。 |
| reset | 定义重置按钮。清除表单中的所有数据。 |
| submit | 定义提交按钮。把表单数据发送到服务器。 |
| text | 定义单行的输入字段,默认宽度为 20 个字符。 |
| textarea | 定义多行文本输入字段 <textarea>默认值</textarea> |
| select和option | 定义下拉列表框 |
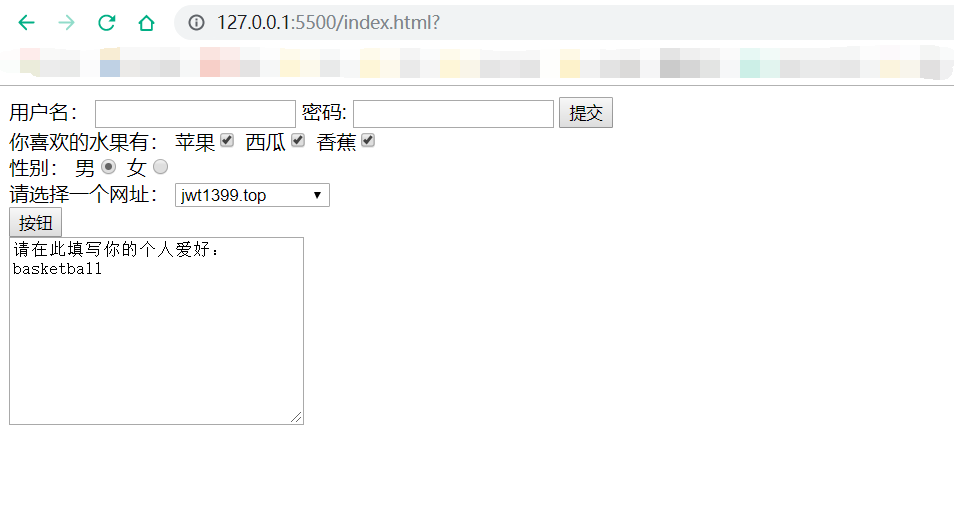
文本:
      用户名:
      <input type="text">
      密码:
      <input type="password">
提交:
<input type="submit" value="提交">
复选框:
      你喜欢的水果有:
      苹果<input type="checkbox">
      西瓜<input type="checkbox">
      香蕉<input type="checkbox">
单选框:
     性别:
     男<input type="radio" name="sex">
     女<input type="radio" name="sex">
下拉列表:
    请选择一个网址:
    <select>
        <option>jwt1399.top</option>
        <option>www.baidu.com</option>
        <option>www.google.com</option>
    </select>
按钮:
<input type="button" value="按钮">
文本域:(放在<form>之外)
<textarea cols="30" rows="10">请在此填写你的个人爱好:</textarea>
上方标签演示: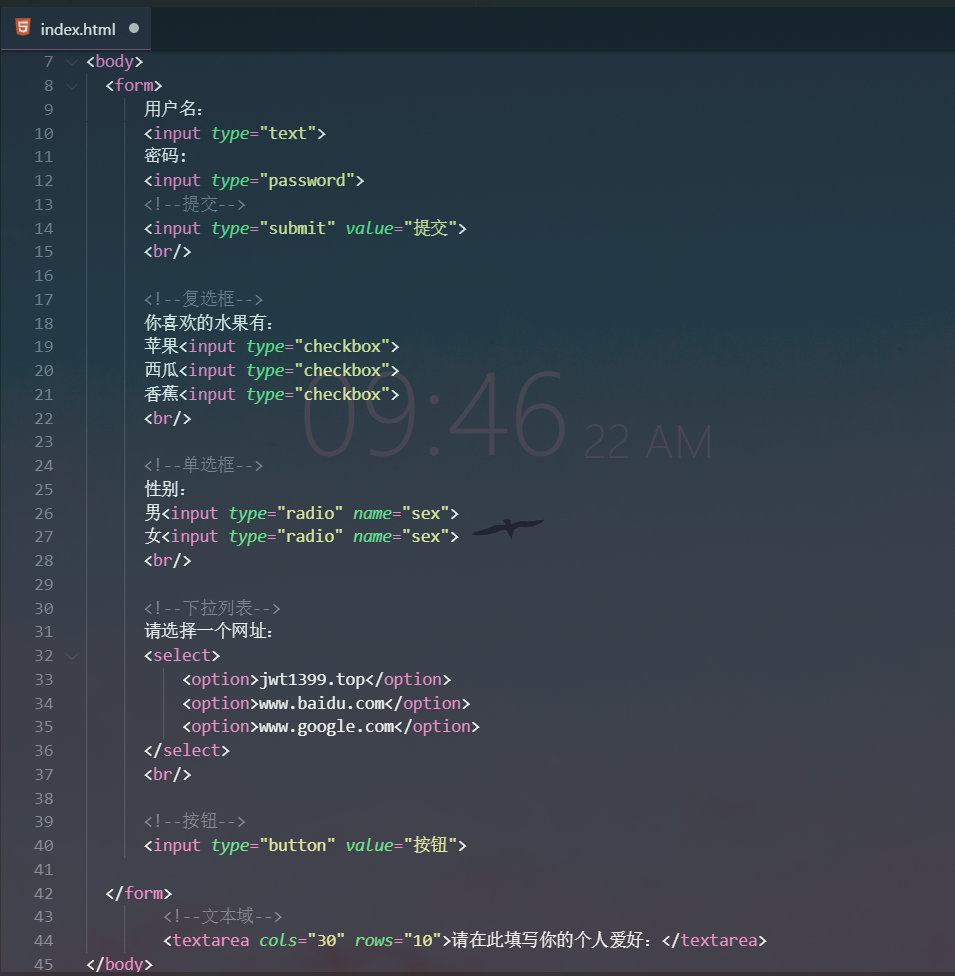
9 新增表单input元素
| type新属性值 | 描述 |
|---|---|
| type=“tel” | 输入电话号码 |
| type=”email” | 限制用户输入必须为Email类型 |
| type=”url” | 限制用户输入必须为URL类型 |
| type=”number” | 限制用户输入必须为数字类型 |
| type=”range” | 产生一个滑动条的表单 |
| type=”search“ | 产生一个搜索意义的表单 |
| type=”color” | 生成一个颜色选择表单 |
| type=”time” | 限制用户输入必须为时间类型 |
| type=”date” | 限制用户输入必须为日期类型 |
| type=”month” | 限制用户输入必须为月类型 |
| type=”week” | 限制用户输入必须为周类型 |
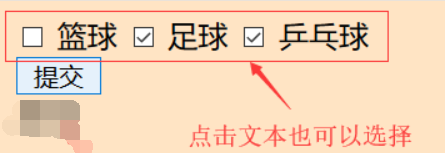
<label>表单控件 |
方便鼠标点击使用,label 元素内点击文本,就会触发此控件 |
<label>用法:<label for="控件id"></label> |
<form>
      <input type="checkbox" name="user_ball"  id="basketball">
      <label for="basketball">篮球</label>

      <input type="checkbox" name="user_ball"  id="football" checked>
      <label for="football">足球</label>

      <input type="checkbox" name="user_ball"  id="pingpangball">
      <label for="pingpangball">乒乓球</label>
</form>
10 表单与PHP交互
GET方式交互:
首先建立一个表单:
 <!-- action:提交的地址,method:提交方式-->
  <form action="http://127.0.0.1/eg.php" method="GET">
      用户名:<input type="text" name="id">
      密  码: <input type="password" name="password">
      <!--提交-->
      <input type="submit" value="提交">
      <br/>
  </form>
表单交互的文件:eg.php
<?php
header("Content-type: text/html; charset=utf-8");//防止中文乱码
echo "用户名:".$_GET['id']."<br>密码:".$_GET['password'];//输出GET方式传进的id和password
?>
php文件放在本地服务器的www目录下才能运行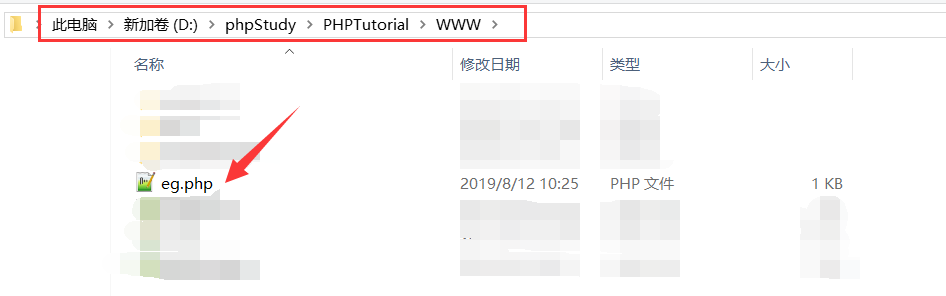
查看我们写好的表单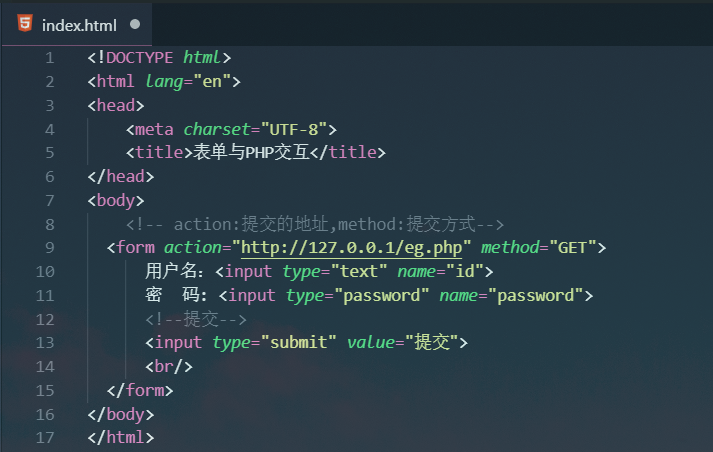
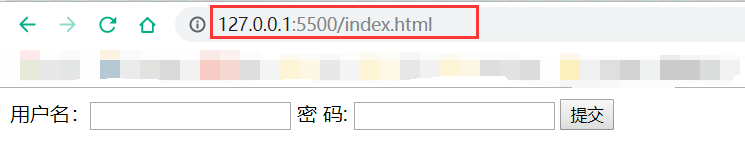
输入用户名和密码,点击提交,发现已经被提交到了目标地址,id和password会直接显示在URL框中,POST方式则不会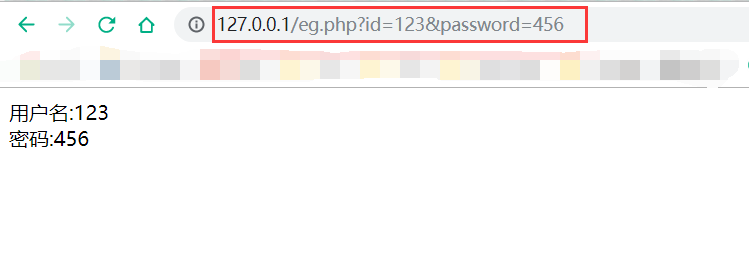
POST方式交互:
首先建立一个表单:
 <!-- action:提交的地址,method:提交方式-->
  <form action="http://127.0.0.1/eg.php" method="POST">
      用户名:<input type="text" name="id">
      密  码: <input type="password" name="password">
      <!--提交-->
      <input type="submit" value="提交">
      <br/>
  </form>
表单交互的文件:eg.php
<?php
header("Content-type: text/html; charset=utf-8");//防止中文乱码
echo "用户名:".$_POST['id']."<br>密码:".$_POST['password'];//输出POST方式传进的id和password
?>
查看我们写好的表单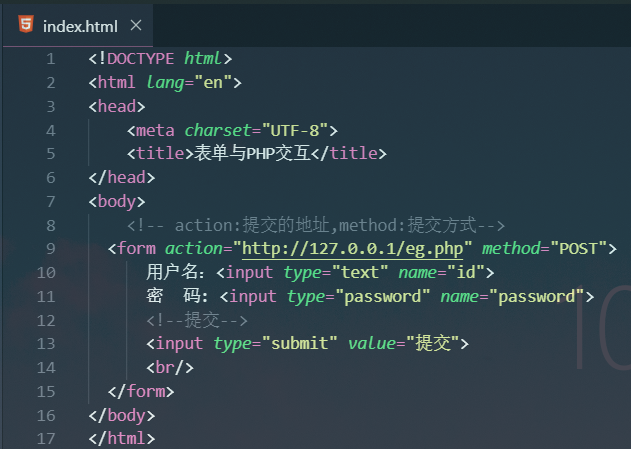
输入用户名和密码,点击提交,发现已经被提交到了目标地址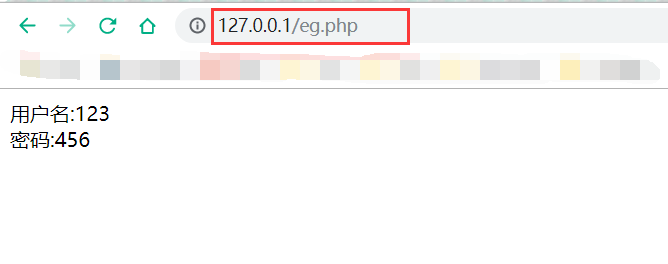
11 框架
框架:<frame>
框架集:<frameset>
内联框架:<iframe>
不放在<body>中
<!DOCTYPE html>
<html lang="en">
<head>
    <meta charset="UTF-8">
    <title>框架</title>
</head>
<!--cols:纵向 rows:横向-->
    <frameset rows="20%,50%,30%">
        <frame src="frame1.html">
        <frame src="frame2.html">
        <frame src="frame3.html">
    </frameset>
</html>
frame1.html(frame2和3一样只是bgcolor颜色改一哈)
<!DOCTYPE html>
<html lang="en">
<head>
    <meta charset="UTF-8">
    <title>Document</title>
</head>
<body bgcolor="blue">
</body>
</html>
上方运行结果: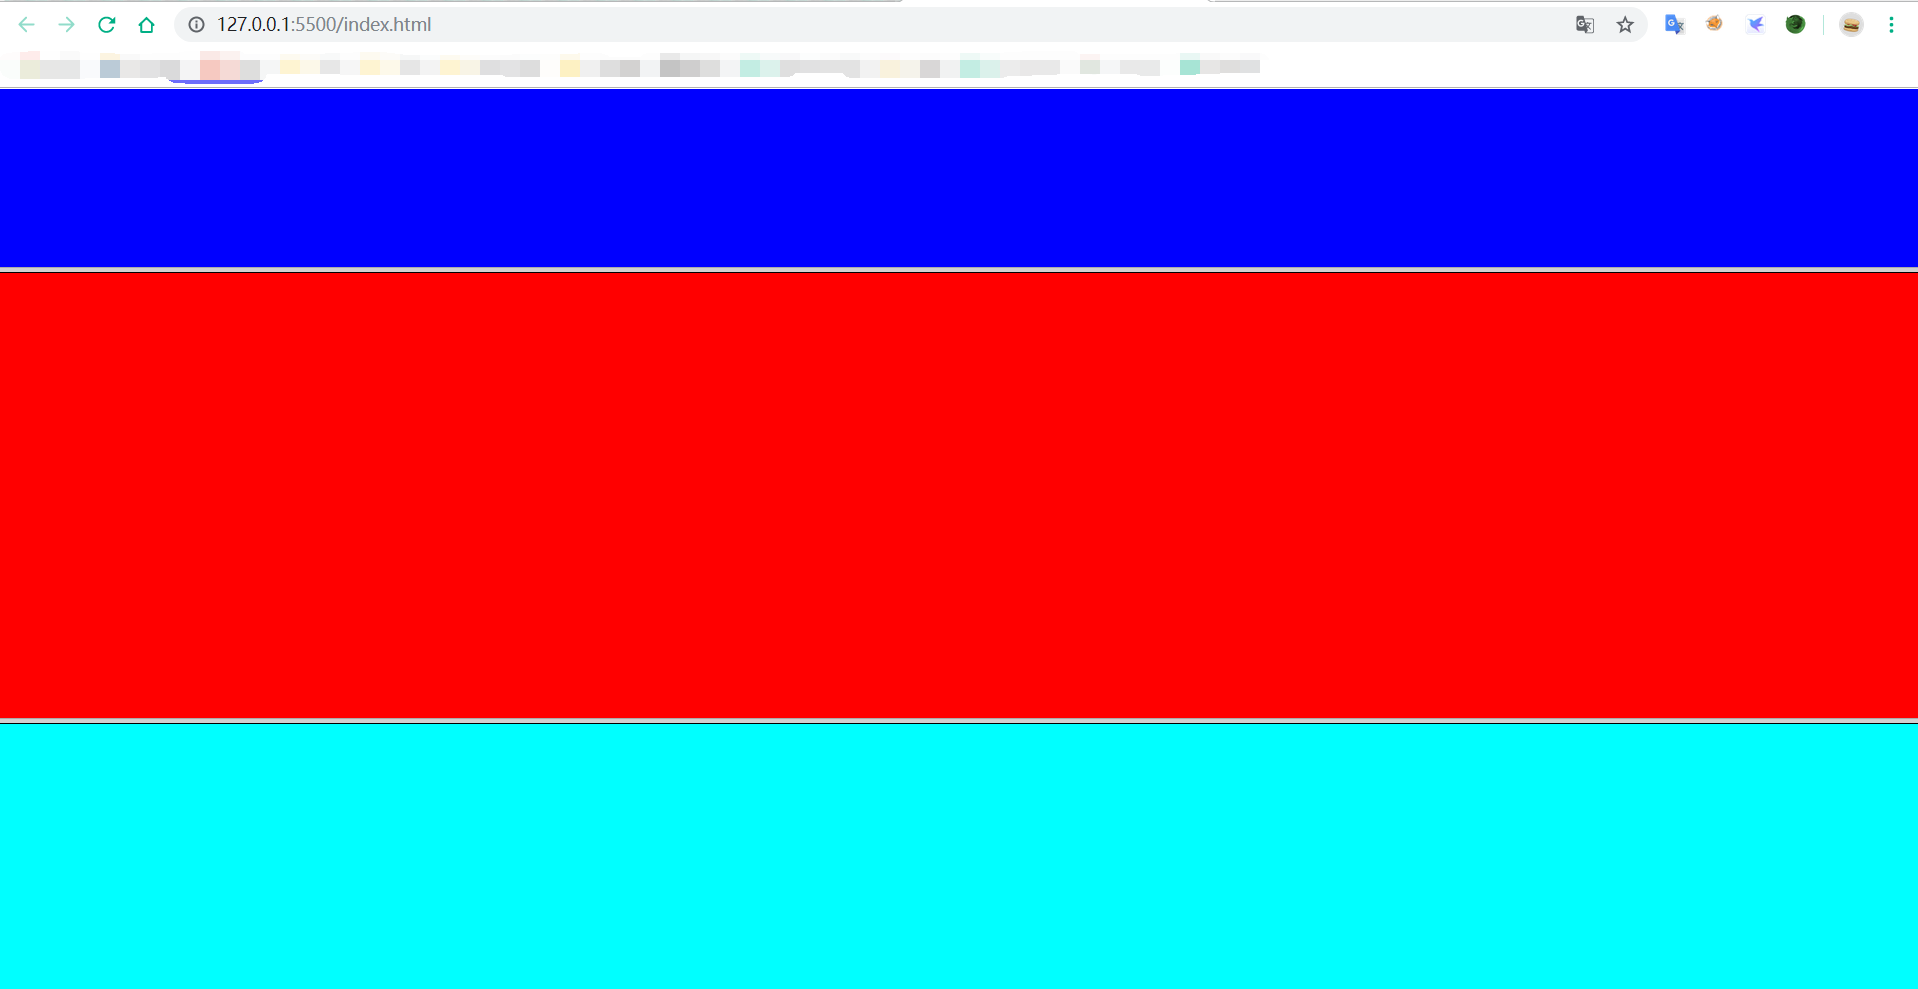
内联框架:
index.html
<!DOCTYPE html>
<html lang="en">
<head>
    <meta charset="UTF-8">
    <title>框架</title>
</head>
    <br>
    <iframe src="frame3.html" frameborder="0" width="800px" height="800px"></iframe>
</html>
frame1.html
<!DOCTYPE html>
<html lang="en">
<head>
    <meta charset="UTF-8">
    <title>Document</title>
</head>
<body bgcolor="aquamarine">
   Frame1<br>
   <!--target的4个参数:_self:自己本身打开打开,_blank:新窗口打开,_parent:父窗口打开,_top:顶级页面打开-->
   <a href="https://jwt1399.top" target="_self">简简的博客在本身打开</a><br>
   <a href="https://jwt1399.top" target="_blank">简简的博客在新窗口打开</a><br>
   <a href="https://jwt1399.top" target="_parent">简简的博客再父窗口打开</a><br>
   <a href="https://jwt1399.top" target="_top">简简的博客在顶级页面(index页面)打开</a><br>
</body>
</html>
frame2.html
<!DOCTYPE html>
<html lang="en">
<head>
    <meta charset="UTF-8">
    <title>Document</title>
</head>
<body bgcolor="red">
    Frame2
    <br>
    <iframe src="frame1.html" frameborder="0" width="400px" height="400px"></iframe>
</body>
</html>
frame3.html
<!DOCTYPE html>
<html lang="en">
<head>
    <meta charset="UTF-8">
    <title>Document</title>
</head>
<body bgcolor="aqua" >
    Frame3
    <br>
    <iframe src="frame2.html" frameborder="0" width="600px" height="600px"></iframe>
</body>
</html>
index承载frame3,frame3承载frame2,frame2承载frame1,frame1中放入超链接
上方示例演示:
参考
HTML5 标签含义之元素周期表
极客学院-HTML
菜鸟教程-HTML
W3cSchool-HTML
HTML实例练习
相信看完前面部分,你已经掌握了HTML,然而大多数同学可能跟我一样,还是不太熟悉,不能很流畅的使用
下面通过实例来巩固HTML
目的
掌握常用的HTML文本、超链接和图像标签的使用;
掌握HTML表格标签,能够使用表格进行简单的网页布局设计;
掌握HTML表单应用,包括HTML5新增的输入域类型和属性的使用。
题目
请按要求设计一个学生信息注册网页,可以使用表格布局,页面内容居中显示,如图1所示,主要要求如下:
(1) 设置页面标题为“新生报到”;
(2) 使用h3标签居中显示“注册信息”,并设置一个页面顶部锚点;
(3) 在注册信息填写区域前后设置水平分隔线;
(4) 表单使用get提交方式,表单中所有输入域必须设置name属性,设置表单的自动完成功能;
(5) 设置用户名、学号和密码为必填项,在输入域后显示红色“*”号,设置用户名输入框默认获得焦点,密码输入框中 提示用户“请输入6位密码”;
(6) 除用户名、学号、密码、单选按钮、复选框、列表框和文本区之外,其它input元素必须为HTML5新增的输入类型;
(7) 性别默认选择“女”,借助label标签使得用户可以通过单选按钮后的文本进行勾选;
(8) 身高最大,最小,步长和默认值分别为190,150,5,175厘米;体重最大,最小,步长和默认值分别为90,45,2,55千克;
(9) 电话号码输入框中提示“请输入11位”数字,并设置pattern属性进行校验;
(10) 家庭住址下拉列表中依此设置“北京、上海、成都”三个选项,默认选择“成都”;
(11) 复选框中默认选择足球;
(12) 使用datalist标签为“喜欢的网站”输入框提供可选网址列表,如图2所示;x
(13) 邮政编码输入框中提示“请输入6位邮政编码”,并设置pattern属性进行校验;x
(14) 上传2张生活照;
(15) 个人自述文本区设置行数为5行,列数为50,默认显示文本“我是一位特别热爱学习的好孩子。。。”
(16) 插入一个隐藏域,设置value值为你的幸运数字;
(17) 设置“注册”和“重置”两个按钮,居中显示;
(18) 在页面底部插入“电话”、“短信”、“E-Mail”和“返回顶部”4个导航链接,前三个导航链接必须使用相应的超链接伪协议,“返回顶部”链接到页面顶部锚点。另外,需设置链接状态样式,链接字体为蓝色,已访问过为灰色,鼠标经过是为红色,鼠标按下时为黄色。
| 效果图 |  |
|---|---|
| 效果图 |  |
解答
具体每步答案,请对应看注释
<!doctype html>
<html>
    <head>
    <meta charset="utf-8">
    <!--<meta name="viewport" content="width=device-width, initial-scale=1.0, user-scalable=no">-->
    <title>新生报到</title><!--题目1-->
    <style> /*题目18*/
        a {text-decoration: none;}	/*定义标准的文本*/
        a:link {color: blue;}	/*点击前蓝色*/
        a:visited {color: gray;}	/*访问后灰色*/
        a:hover {color: red;}	/*鼠标经过是红色*/
        a:active {color: yellow;}	/*鼠标按下时黄色*/
    </style>
    </head>
    <body>
        <h3 id="title" align="center">注 册 信 息</h3><!--题目2-->
        <hr noshade size="1" width="80%"><!--题目3-->
        <form action="" id="form1" autocomplete="on" method="get"><!--题目4-->
            <table  width="80%" border="0" align="center" cellspacing="0">
                <tr> <!--题目5-->
                    <td width="30%" align="right">姓名:</td>
                    <td width="5%"></td>
                    <td align="left"><input type="text"  name="user_name" maxlength="10" autofocus required/><font color="#FF0000"> *</font></td>
                </tr>

                <tr> <!--题目5-->
                    <td width="30%" align="right">学号:</td>
                    <td></td>
                    <td align="left"><input type="text"  name="user_id" required/><font color="#FF0000"> *</font></td>
                </tr>

                <tr> <!--题目5-->
                    <td width="30%" align="right">密码:</td>
                    <td></td>
                    <td align="left"><input type="password"  name="user_paw"  placeholder="请输入8位密码" required /><font color="#FF0000"> *</font></td>
                </tr>
                <tr> <!--题目7-->
                    <td width="30%" align="right">性别:</td>
                    <td></td>
                    <td align="left">
                    <input type="radio" id="male" name="user_sex" value="man"/>
                    <label for="male">男</label>
                    <input type="radio" id="female"  name="user_sex" value="woman" checked/>
                    <label for="female">女</label></td>
                </tr>
                <tr> <!--题目8-->
                    <td width="30%" align="right">身高:</td>
                    <td></td>
                    <td align="left"><input type="number"  name="user_height" min="150" max="190" value="175" step="5" />厘米</td>
                </tr>
                <tr> <!--题目8-->
                    <td width="30%" align="right">体重:</td>
                    <td></td>
                    <td align="left"><input type="range"  name="user_weight" min="45" max="90" value="55" step="2" />千克</td>
                </tr>

                <tr>
                    <td width="30%" align="right">出生日期:</td>
                    <td></td>
                    <td align="left"><input type="date"  name="user_birthday"/></td>
                </tr>

                <tr> <!--题目9-->
                    <td width="30%" align="right">电话号码:</td>
                    <td></td>
                    <td align="left"><input type="tel"  name="user_tel" pattern="\d{11}" placeholder="请输入11手机号码"/></td>
                </tr>

                <tr>
                    <td width="30%" align="right">E-mail:</td>
                    <td></td>
                    <td align="left"><input type="email"  name="user_email"/></td>
                </tr>

                <tr>
                    <td width="30%" align="right">个人主页:</td>
                    <td></td>
                    <td align="left"><input type="url"  name="user_homepage" autocomplete="off"/></td>
                </tr>

                <tr> <!--题目10-->
                    <td width="30%" align="right">家庭住址:</td>
                    <td></td>
                    <td align="left"><select name="user_address" >
                    <option value="0" >北京</option>
                    <option value="1" >上海</option>
                    <option value="2" selected>成都</option>
                </select></td>
                </tr>

                <tr> <!--题目13-->
                    <td width="30%" align="right">邮政编码:</td>
                    <td></td>
                    <td align="left"><input type="text"  name="user_zipcode" pattern="[0-9]{6}" placeholder="请输入6位邮政编码" /></td>
                </tr>

                <tr>
                    <td width="30%" align="right">喜欢的颜色:</td>
                    <td></td>
                    <td align="left"><input type="color"  name="user_color"/></td>
                </tr>

                <tr> <!--题目11-->
                    <td width="30%" align="right">喜欢的运动:</td>
                    <td></td>
                    <td align="left"><input type="checkbox" name="user_habit1" value="basketball"/>篮球
            <input type="checkbox" name="user_habit2" value="football" checked>足球
            <input type="checkbox" name="user_habit3" value="swimming">游泳 </td>
                </tr>

                <tr> <!--题目12-->
                    <td width="30%" align="right">喜欢的网站:</td>
                    <td></td>
                    <td align="left"><input type="url" name="user_favurl" list="urllist"/>
            <datalist id="urllist" >
                    <option label="百度" value="http://www.baidu.com"/>
                    <option label="新浪" value="http://www.sina.com"/>
                    <option label="谷歌" value="http://www.google.com"/>
                    <option value="http://www.163.com">网易</option>
            </datalist></td>
                </tr>

                <tr> <!--题目14-->
                    <td width="30%" align="right">生活照2张:</td>
                    <td></td>
                    <td align="left"><input type="file"  name="user_album"  multiple/></td>
                </tr>

                <tr> <!--题目15-->
                    <td width="30%" align="right" valign="top">个人自述:</td>
                    <td></td>
                    <td align="left"><textarea name="info" rows="5" cols="50">我是一位特别热爱学习的好孩子。。。</textarea></td>
                </tr>

                <tr>
                    <td width="30%" align="center" colspan="3">
                    <input type="hidden" name="user_secret" value="7"/><!--题目16-->
                    <pre><input type="submit" value="注册"/>               <input type="reset" value="重置" /></pre><!--题目17-->
            </td>
                </tr>

                <tr><!--题目3-->
                    <td colspan="3"><hr noshade size="1" width="100%"></td>
                </tr>

                <tr>
                    <td colspan="3">
                        <table width="100%"><!--题目18-->
                            <tr align="center">
                                <td width="25%"><a href="tel:10086">电话</a></td>
                                <td width="25%"><a href="sms:10086">短信</a></td>
                                <td width="25%"><a href="mailto:10086@sina.com">E-mail</a></td>
                                <td width="25%"><a href="#title">返回顶部</a></td>
                            </tr>
                        </table>
                    </td>
                </tr>

            </table>
    </form>

</body>
</html>
CSS
CSS 指层叠样式表 (Cascading Style Sheets),定义如何显示 HTML 元素
1 基础
CSS 规则由两个主要的部分构成:选择器,以及一条或多条声明。
selector {declaration1; declaration2; ... declarationN }
选择器通常是您需要改变样式的HTML元素。
每条声明由一个属性和一个值组成。
下面这行代码的作用是将h1元素内的文字颜色定义为红色,同时将字体大小设置为 14 像素。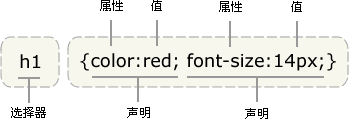
HTML引入CSS
外部(链接)样式:(放在head中)
<link rel="stylesheet" type="text/css" href="xxx.css">
xxx.css
p{
    color:red;
 }
内嵌样式:(放在head中)
<style type="text/css">
p{
    color:red;
}
</style>
行内样式:
<p style="color:red;"></p>
导入样式:
<style>
        @import url("style/mystyle.css");
</style>
导入样式与链接样式的区别:
导入样式在HTML文件初始化时被导入到文件中,作为文件的一部分;链接样式是在HTML标记需要样式风格时才以链接方式引入。显然,链接样式可加快页面的初始化。
优先级:行内样式》》内嵌样式》》链接样式》》导入样式
2 继承及其问题
根据 CSS,子元素从父元素继承属性。但是它并不总是按此方式工作。看看下面这条规则:
body {
     color:red;
     }
通过 CSS 继承,子元素将继承最高级元素(在本例中是 body)所拥有的属性(这些子元素诸如 p, td, ul, ol, ul, li, dl, dt,和 dd)。不需要另外的规则,所有 body 的子元素都应该显示红色,子元素的子元素也一样。
如果你不希望"color:red"被所有的子元素继承,比方说,你希望段落颜色是green。重新创建一个针对p的特殊规则,这样它就会摆脱父元素的规则:
body  {
    color:red;
     }

p  {
     color:green;
     }
3 CSS的层叠性
一个元素被同一选择器多次定义,或被多个类选择器选中时,采用最后被定义的样式
实例:  h1{color: red;}
       h1{color: blue;} #采用最后被定义的样式


实例:	.purple{color: purple;}
      .red{color: red;}
     <p class="purple red">类选择器</p> #采用最后被定义的样式
当同一元素被不同选择器选中时,一般的采用就近原则
优先级关系:ID选择器》类选择器》标签选择器
<!DOCTYPE html >
<head>
<title>层叠特性</title>
<style type="text/css">
    p{color:black;}
    .red{color:red;}
    .purple {color:purple;}
    #p1{color:blue;}
</style>
</head>
<body>
    <p >这是第1行文本</p>
    <p class="red">这是第2行文本</p> <!--类选择器优先与标签选择器-->
    <p id="p1" class="red">这是第3行文本</p><!--id选择器优先-->
    <p style="color:green;" id="p1">这是第4行文本</p><!--行内样式优先-->
    <p class="purple red">这是第5行文本</p> <!--采用最后被定义的样式purple-->
</body>
</html>

4 选择器
| 类型 | 基本语法 | 说明 |
|---|---|---|
| 标签选择器 | body{property: value} | 适用于标签中的所有元素 |
| ID选择器 | #id{property: value} | 针对特定(一个)元素 |
| 类选择器 | **.**class{property: value} | 为一系列元素定义相同样式 |
| 全局选择器 | *{property: value} | 表示对所有元素起作用 |
| 属性选择器 | [title] { property: value } | 对带有指定属性的元素设置样式 |
标签选择器
适用于标签中的所有元素
body {font-style: italic;}
4.1 id选择器
可以为标有特定 id 的 HTML 元素指定特定的样式。
id 选择器以 “#” 来定义。
下面的两个 id 选择器,第一个可以定义元素的颜色为红色,第二个定义元素的颜色为绿色:
#a {color:red;}
#b {color:green;}
下面的 HTML 代码中,id 属性为 a 的 p 元素显示为红色,而 id 属性为 b 的 p 元素显示为绿色。
<p id="a">这个段落是红色。</p>
<p id="b">这个段落是绿色。</p>
4.2 类选择器
为一系列元素定义相同样式
在 CSS 中,类选择器以一个点号显示:
.A {text-align: center}
所有拥有 A 类的 HTML 元素均为居中。
在下面的 HTML 代码中,h1 和 p 元素都有 A 类。这意味着两者都将遵守 “.A” 选择器中的规则。
<h1 class="A">
This heading will be center-aligned
</h1>

<p class="A">
This paragraph will also be center-aligned.
</p>
4.3 全局选择器
对所有元素起作用
*{
  color:red;
  font-size:30px
}
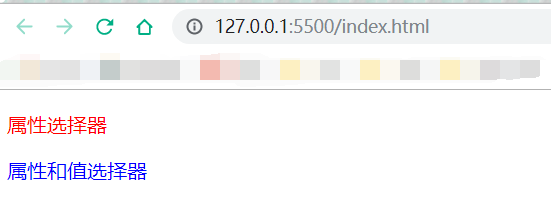
4.4 属性选择器
对带有指定属性的 HTML 元素设置样式。
下面的例子为带有title属性的所有元素设置样式:
[title]
{
color:red;
}
属性和值选择器:对带有指定属性和值的 HTML 元素设置样式。
下面的例子为title="jwt"的所有元素设置样式:
[title=jwt]
{
border:5px solid blue;
}
示例演示: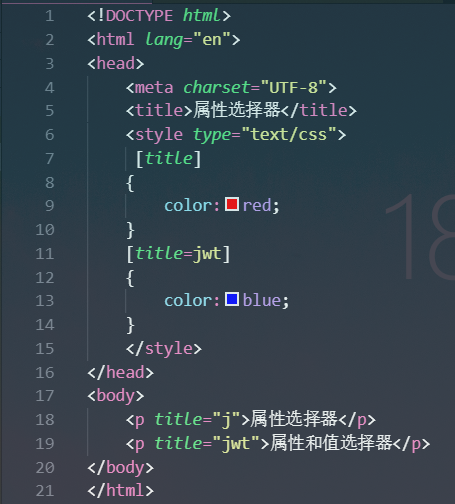
5 复合选择器
| 类型 | 基本语法 | 说明 |
|---|---|---|
| 并集选择器 | E1, E2, E3 {property: value} | 多个选择器使用相同样式 |
| 交集选择器 | E.myclass E#myid | 选择类名为my class或 id 为 myid 的 E元素 |
| 包含选择器 | E F | 选择所有被E元素包含的F元素。 |
| 子选择器 | E>F | 选择所有作为E元素的子元素 F。 |
| 相邻选择器 | E+F | 选择紧贴在E元素之后F元素。 |
| 兄弟选择器 | E~F | 选择E元素后的所有兄弟元素F。 |
5.1 并集选择器
多个选择器使用相同样式
h1,h2,h3,p {
  color: green;
  }
所有的h1-h3标题,段落,元素都是绿色的。
5.2 交集选择器
选择类名为class或id为myid 的E元素
hr#hr1{height:13px;}
p.p1{color:blue;}
选择水平分割线id为hr1的高度为13px,选择段落类名为p1的颜色为蓝色
<hr id="hr1">
<p class="p1">李白</p>
<p class="p1 p2">李白</p>
<hr id="hr2">
一个元素只能有一个唯一的ID,但可以属于多个类
5.3 包含选择器
E F: 选择所有被E元素包含的F元素。
<style type="text/css">
    h1{color:red;}
    h1 strong{
        color:blue;
        font-size:40px;
    }
</style>
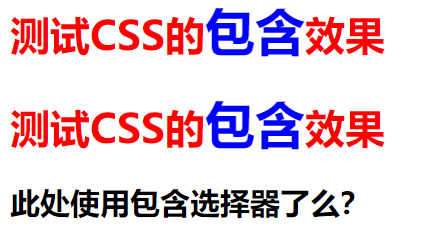
上方选择了被h1包含的所有strong元素变为蓝色
<body>
    <h1>测试CSS的<strong>包含</strong>效果</h1>
    <h1>测试<span>CSS的<strong>包含</strong>效果</span></h1>
    <h2>此处使用<strong>包含选择器</strong>了么?</h2>
</body>
5.4 子选择器
E>F: 选择所有作为E元素的子元素 F,孙子不选
<style type="text/css">
    h1{color:red;}
    h1>strong{
        color:blue;
        font-size:40px;
    }
</style>
上方选择了被h1包含的儿子strong元素变为蓝色
<body>
    <h1>测试CSS的<strong>包含</strong>效果</h1>
    <h1>测试<span>CSS的<strong>包含</strong>效果</span></h1>
    <h2>此处使用<strong>包含选择器</strong>了么?</h2>
</body>

包含选择器与子选择器的区别:包含选择器包括子子孙孙F元素,而子选择器只选择子代F元素,而忽略孙辈元素。
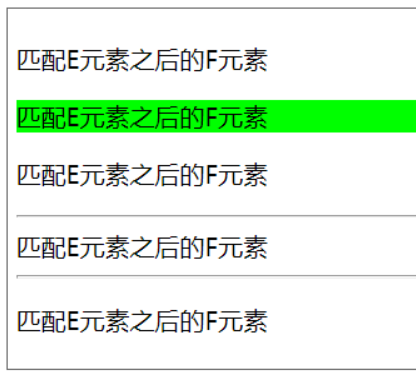
5.5 相邻选择器
E+F: 选择紧贴在E元素之后F元素。
<style type="text/css">
    div + p {background-color:#00FF00;}/*相邻选择器*/
</style>
上方选择了div元素之后的紧邻p元素背景颜色变为绿色
<div style="width:733px; border: 1px solid #666; padding:5px;">
    <div>
        <p>匹配E元素之后的F元素</p>
    </div>
    <p>匹配E元素之后的F元素</p>
    <p>匹配E元素之后的F元素</p>
    <hr />
    <div>匹配E元素之后的F元素</div>
    <hr />
    <p>匹配E元素之后的F元素</p>
</div>
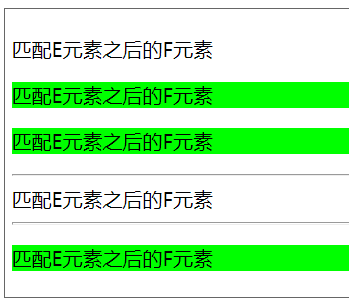
5.6 兄弟选择器
E~F: 选择E元素后的所有兄弟元素F。
<style type="text/css">
    div ~ p {background-color:#00FF00;}/*兄弟选择器*/
</style>
上方选择了div元素之后的所有兄弟p元素背景颜色变为绿色
<div style="width:733px; border: 1px solid #666; padding:5px;">
    <div>
        <p>匹配E元素之后的F元素</p>
    </div>
    <p>匹配E元素之后的F元素</p>
    <p>匹配E元素之后的F元素</p>
    <hr />
    <div>匹配E元素之后的F元素</div>
    <hr />
    <p>匹配E元素之后的F元素</p>
</div>
6 元素状态选择器
指定样式只有当元素处于某种状态时才起作用。
| 选择器 | 说明 |
|---|---|
| E:link | 设置超链接a在未被访问前的样式。 |
| E:visited | 设置超链接a在其链接地址已被访问过时的样式。 |
| E:hover | 设置元素在其鼠标悬停时的样式。 |
| E:active | 设置元素在被用户激活(点击与释放之间)时的样式。 |
| E:focus | 设置元素在成为输入焦点(该元素的onfocus事件发生)时的样式。 |
| E:checked | 处于选中状态的元素E |
| E:enabled | 处于可用状态的元素E |
| E:disabled | 处于禁用状态的元素E |
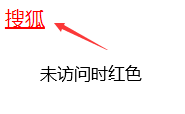
6.1 超链接状态选择器
    <head>
        <title>连接状态选择器</title>
        <style>
            a:link {color: red}		    /* 未访问的链接 */
            a:visited {color: green}	/* 已访问的链接 */
            a:hover {color:blue}	 /* 鼠标移动到链接上*/
            a:active {color: orange}	/* 选定的链接 */
        </style>
    </head>
    <body>
        <a href="http://www.sohu.com">搜狐</a>
    </body>
| 未访问的链接 | 已访问的链接 | 鼠标移动到链接上 | 选定的链接 |
|---|---|---|---|
 |
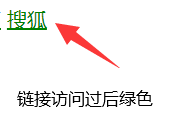 |
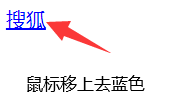 |
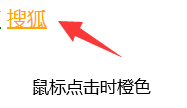 |
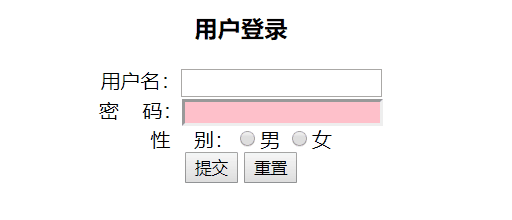
6.2 UI元素状态伪类选择器
<head>
<title>UI元素状态选择器</title>
<style>
input:hover { background:red; }
input:focus { background:blue; }
input:active { background:green; }
/*focus规则放在active规则之后会覆盖active样式*/
/*input:focus { background:yellow; }*/
input:disabled { background:pink; }
input:checked+span{background-color:#00f}
</style>
</head>
<body>
<center>
<h3 align=center>用户登录</h3>
<form method="post" action="">
用户名:<input type=text name=name><br>
密 码:<input type=password name=pass disabled="disabled"><br>
性 别:<input type="radio" name="sex" value="1"/><span>男</span>
<input type="radio" name="sex" value="0" /><span>女</span><br>
<input type=submit value=提交>
<input type=reset value=重置>
</form>
<center>
</body>
7 伪对象选择器
| 选择器 | 说明 |
|---|---|
| E:first-letter | 设置对象内的第一个字符的样式。 |
| E:first-line | 设置对象内的第一行的样式。 |
| E::selection | 设置对象被选择时的颜色。 |
| E:before | 设置在对象前(依据对象树的逻辑结构)发生的内容。用来和content属性一起使用 |
| E:after | 设置在对象后(依据对象树的逻辑结构)发生的内容。用来和content属性一起使用 |
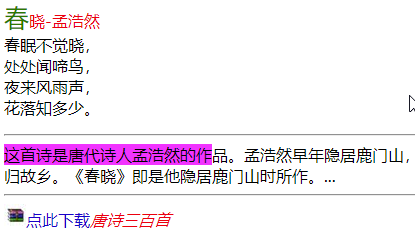
<head>
<style>
    p:first-line{color:red}
    p::first-letter{color:green;font-size:25px}
    span::selection{background:#F0F}
    a:before{content:url(images/rar.jpg)}
    a:after {content:"唐诗三百首"; font-style:italic; color:#f00}
</style>
</head>
<body>
    <p>
        春晓-孟浩然<br />
        春眠不觉晓,<br />
        处处闻啼鸟,<br />
        夜来风雨声,<br />
        花落知多少。<br />
    </p>
    <hr />
    <span>这首诗是唐代诗人孟浩然的作品。孟浩然早年隐居鹿门山...</span>
    <hr />
    <a href="#">点此下载</a>
</body>
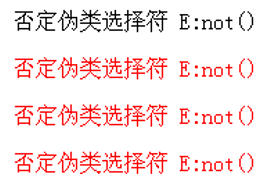
8 否定伪类选择器
E:not(s) 否定伪类选择器,匹配不含有s选择符的元素E。
<head>
<style>
     p:not(.abc){color:#f00;}
</style>
</head>
<body>
    <p class="abc">否定伪类选择符 E:not()</p>
    <p id="abc">否定伪类选择符 E:not()</p>
    <p class="abcd">否定伪类选择符 E:not()</p>
    <p>否定伪类选择符 E:not()</p>
</body>
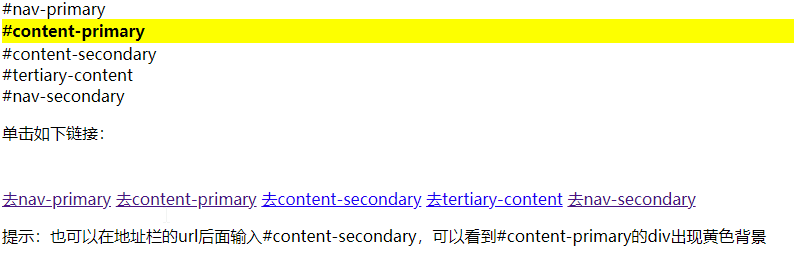
9 目标伪类选择器
E:target 目标伪类选择器,选择匹配E同时被URL指向的元素。
<!doctype html>
<html>
<head>
<meta charset="utf-8">
<style type="text/css">
div:target{
    background-color:#FF0;
    font-weight:bold;
    line-height:24px; }
p{ height:50px;}
</style>
<title>目标伪类 E:target 测试</title>
</head>
<body>
    <div id="nav-primary">#nav-primary</div>
    <div id="content-primary">#content-primary</div>
    <div id="content-secondary">#content-secondary</div>
    <p>单击如下链接:</p>
    <a href="#nav-primary">去nav-primary</a>
    <a href="#content-primary" target="_self">去content-primary</a>
    <a href="#content-secondary" target="new">去content-secondary</a>
    <p>提示:也可以在地址栏的url后面输入#content-secondary,可以看到#content-primary的div出现黄色背景</p>
</body>
</html>
10 颜色
| 单位 | 描述 |
|---|---|
| (颜色名) | 颜色名称 (比如 red) |
| rgb(x,x,x) | RGB 值 (比如 rgb(255,0,0)) |
| rgba(x,x,x,x) | rgba(255,0,0,0.3) 最后一个参数为颜色透明度 |
| rgb(x%, x%, x%) | RGB 百分比值 (比如 rgb(100%,0%,0%)) |
| #rrggbb | 十六进制数 (比如 #ff0000) |
| hsl(h,s,l) | h:色调 s:饱和度 l:亮度 hsl(360,50%,50%) |
| hsla(h,s,l,a) | a:透明度 0-1 hsla(360,50%,50%,0.1) |
11 单位
| 单位 | 描述 |
|---|---|
| % | 百分比 |
| in | 英寸 |
| cm | 厘米 |
| mm | 毫米 |
| em | 1em 等于当前的字体尺寸。2em 等于当前字体尺寸的两倍。例如,如果某元素以 12pt 显示,那么 2em 是24pt。在 CSS 中,em 是非常有用的单位,因为它可以自动适应用户所使用的字体。 |
| ex | 一个 ex 是一个字体的 x-height。 (x-height 通常是字体尺寸的一半。) |
| pt | 磅 (1 pt 等于 1/72 英寸) |
| pc | 12 点活字 (1 pc 等于 12 点) |
| px | 像素 (计算机屏幕上的一个点) |
12 字体
字体属性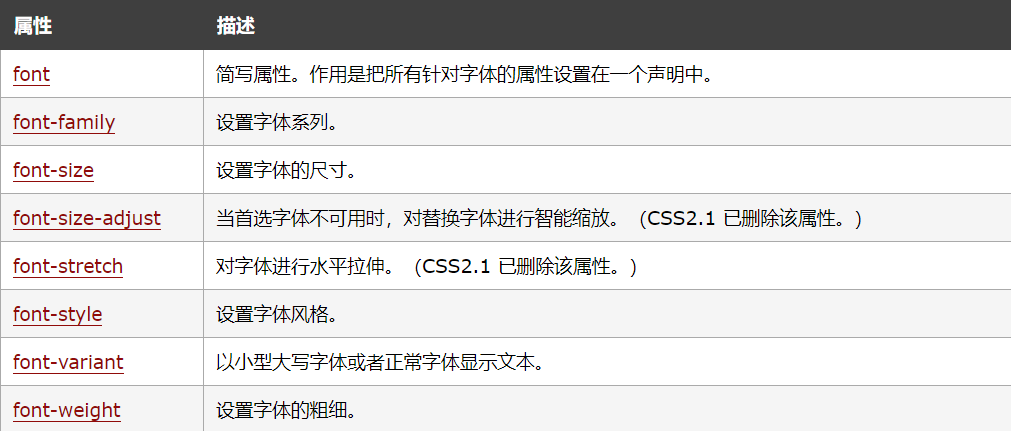
13 文本
文本属性
| 属性 | 描述 |
|---|---|
| color | 设置文本颜色 |
| direction | 设置文本方向。 |
| line-height | 设置行高。 |
| letter-spacing | 设置字符间距。 |
| text-align | 对齐元素中的文本。 |
| vertical-align | 设置对象内容的垂直对齐方式 |
| text-decoration | 向文本添加修饰。 |
| text-indent | 缩进元素中文本的首行。 |
| text-shadow | 设置文本阴影及模糊效果。 |
| text-transform | 控制元素中的字母。 |
| text-overflow | 设置是否使用一个省略标记(…)标示对象内文本的溢出 |
| text-stroke | 复合属性。设置或检索对象中的文字的描边 |
| unicode-bidi | 设置文本方向。 |
| white-space | 设置元素中空白的处理方式。 |
| word-spacing | 设置字间距。 |
13.1 text-overflow 文本溢出
语法:text-overflow:clip|ellipsis
取值:clip:当对象内文本溢出时不显示省略标记(…),而是将溢出的部分裁切掉。ellipsis:当对象内文本溢出时显示省略标记(…),插入位置为最后一个字符。
注意: 该属性需要和overflow:hidden属性(溢出处理)、white-space:nowrap (禁止换行)配合使用,否则无法看到效果。
overflow: hidden;
white-space: nowrap;
text-overflow: ellipsis;
实例
<!doctype html>
<html>
<head>
<meta charset="utf-8">
<title></title>
<style type="text/css">
dl {
width:240px;
height:150px;
border:solid 1px #ccc;
}
dt {
padding:8px 8px;
background:#7FECAD url(images/green.gif) repeat-x;
font-size:13px;
text-align:left;
font-weight:bold;
color:#71790C;
margin-bottom:12px;
border-bottom:solid 1px #efefef;
}
dd {
font-size:0.78em;
height:1.5em;
width:220px;
padding:2px 2px 2px 18px;
background:url(images/icon.gif) no-repeat left 25%;
margin:2px 0;
/*文本溢出处理*/
overflow: hidden;
white-space: nowrap;
text-overflow: ellipsis; /*clip*/
}
</style>
</head>
<body>
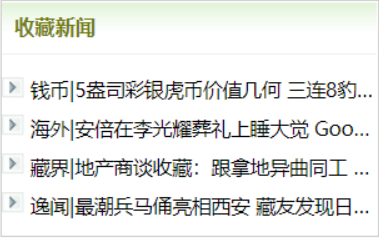
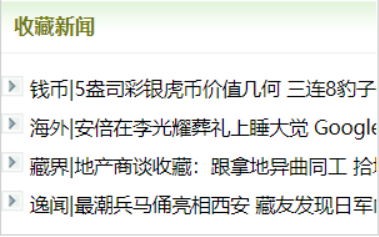
<dl>
<dt>收藏新闻</dt>
<dd>钱币|5盎司彩银虎币价值几何 三连8豹子钞市值达千元 </dd>
<dd>海外|安倍在李光耀葬礼上睡大觉 Google let you know</dd>
<dd>藏界|地产商谈收藏:跟拿地异曲同工 拾垃圾的老外</dd>
<dd>逸闻|最潮兵马俑亮相西安 藏友发现日军内参书籍</dd>
</dl>
</body>
</html>
当使用text-overflow: ellipsis;时:
当使用text-overflow: clip;时:
13.2 text-align 水平对齐
语法:text-align:left | center | right | justify | start | end
取值:
left:内容左对齐。
center:内容居中对齐。
right:内容右对齐。
justify:内容两端对齐。目前chrome浏览器不支持!
start:内容对齐开始边界。(CSS3)
end:内容对齐结束边界。(CSS3)
实例
<!DOCTYPE html>
<html>
<body>
<h1 style="text-align:center">登幽州台歌</h1>
<h3 style="text-align:left">选自:</h3>
<h3 style="text-align:right">唐诗三百首</h3>
<p style="text-align:justify">
  前不见古人
  后不见来者
</p>
<p style="text-align:strat">念天地之悠悠</p>
<p style="text-align:end">独怆然而涕下</p>
</body>
</html>

13.3 vertical-align 垂直对齐
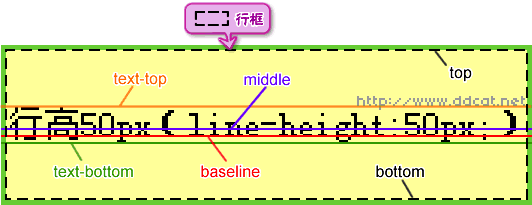
语法:vertical-align: baseline|sub|super|top|text-top|middle |bottom|text-bottom|length;
| 取值 | 描述 |
|---|---|
| baseline | 默认。元素放置在父元素的基线上。 |
| sub | 垂直对齐文本的下标。 |
| super | 垂直对齐文本的上标 |
| top | 把元素的顶端与行中最高元素的顶端对齐 |
| text-top | 把元素的顶端与父元素字体的顶端对齐 |
| middle | 把此元素放置在父元素的中部。 |
| bottom | 把元素的顶端与行中最低的元素的顶端对齐。 |
| text-bottom | 把元素的底端与父元素字体的底端对齐。 |
| length | |
| % | 使用 “line-height” 属性的百分比值来排列此元素。允许使用负值。 |
| inherit | 规定应该从父元素继承 vertical-align 属性的值。 |
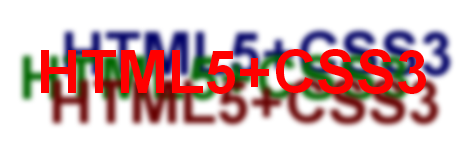
13.4 text-shadow 文本阴影
语法一:
text-shadow: X-offset|Y-offset|模糊半径(Blur)|颜色(Color)
X-offset和Y-offset:分别为阴影在水平和竖直方向上延伸的距离(可正可负)
Color:阴影颜色,默认为字体颜色
Blur:模糊半径,不可为负值
注意:模糊半径和阴影颜色属性值位置可调换

语法二:多重阴影
text-shadow: X-offset|Y-offset|Blur|Color ,
X-offset|Y-offset|Blur|Color**,**
X-offset|Y-offset|Blur|Color;
注意:最先写的阴影显示在最顶层
<!DOCTYPE html>
<html >
<head>
<style type="text/css">
p {
    text-align: center;
    font:bold 60px helvetica, arial, sans-serif;
    color: red;
    text-shadow:0.2em 0.5em 0.1em #600,
                  -0.3em 0.1em 0.1em #060,
                  0.4em -0.3em 0.1em #006;
}
</style>
</head>

<body>
<p>HTML5+CSS3</p>
</body>
</html>
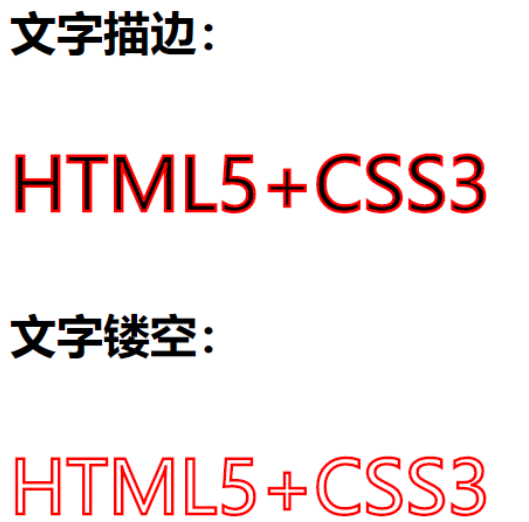
13.5 text-stroke 文本描边
语法:text-stroke: text-stroke-width|text-stroke-color
text-stroke-width:描边厚度
text-stroke-color:描边颜色
<!doctype html>
<html>
<head>
<meta charset="utf-8">
<title>text-stroke_CSS</title>
<style>
    p{
        font-size:50px;
    }
    #text-stroke{
        -webkit-text-stroke:2px red;
        }
    #text-hollow{
        color:white;
        -webkit-text-stroke:2px red;
        }
</style>
</head>
<body>
<div>
    <h1>文字描边:</h1>
    <p id="text-stroke">HTML5+CSS3</p>

    <h1>文字镂空:</h1>
    <p id="text-hollow">HTML5+CSS3</p>
</div>
</body>
</html>
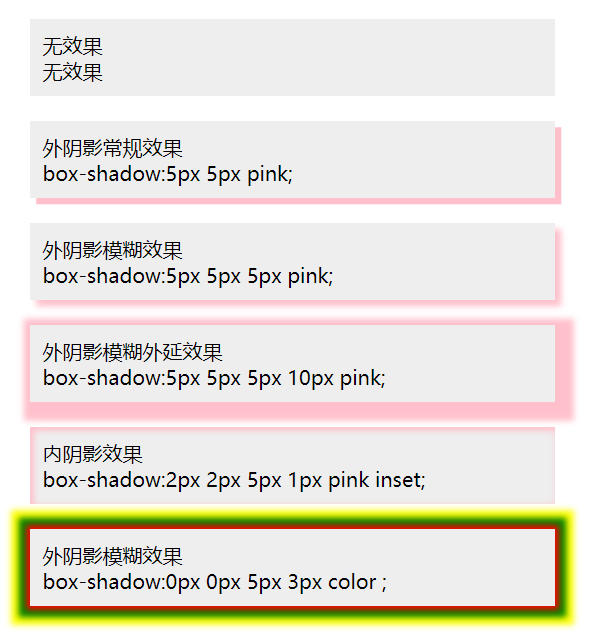
13.6 box-shadow 盒子阴影
语法一:box-shadow: h-shadow | v-shadow | blur | spread | color | inset;
| 值 | 说明 |
|---|---|
| h-shadow | 阴影的水平偏移。允许负值 |
| v-shadow | 阴影的垂直偏移。允许负值 |
| blur | 可选。模糊距离 |
| spread | 可选。阴影延伸的大小,可理解为把阴影向两个方向加大尺度 |
| color | 可选。阴影的颜色。 |
| inset | 可选。内阴影 |
注:前4个参数单位都一样,因此需注意顺序!
语法二:多重阴影
box-shadow: h-shadow v-shadow blur spread color inset ,
h-shadow v-shadow blur spread color inset ,
h-shadow v-shadow blur spread color inset;
实例
<!DOCTYPE html>
<html lang="zh-cn">
<head>
<meta charset="utf-8" />
<title>box-shadow_CSS</title>
<style>
.test li{margin-top:20px;list-style:none;}

.test .out{
     width:400px;
     padding:10px;
     background:#eee;

}
.test .outset{
     width:400px;
     padding:10px;
     background:#eee;
    -webkit-box-shadow:5px 5px pink;/* -webkit-:内核 */

}

.test .outset-blur{
    width:400px;
    padding:10px;
    background:#eee;
    -webkit-box-shadow:5px 5px 5px pink;
}
.test .outset-extension{
    width:400px;
    padding:10px;
    background:#eee;
    -webkit-box-shadow:5px 5px 5px 10px pink;
    box-shadow:5px 5px 5px 10px pink;
    }

.test .inset{
    width:400px;
    padding:10px;
    background:#eee;
    -webkit-box-shadow:2px 2px 5px 1px pink inset;
    box-shadow:2px 2px 5px 1px pink inset;
    }

.test .multiple-shadow{
    width:400px;
    padding:10px;
    background:#eee;
    box-shadow:0 0 5px 3px red,
                0 0 5px 9px green,
                0 0 5px 15px yellow;}
</style>
</head>
<body>
<ul class="test">
    <li class="out">无效果<br/>无效果</li>
    <li class="outset">外阴影常规效果<br/>box-shadow:5px 5px pink;</li>
    <li class="outset-blur">外阴影模糊效果<br/>box-shadow:5px 5px 5px pink;</li>
    <li class="outset-extension">外阴影模糊外延效果<br/>box-shadow:5px 5px 5px 10px pink;</li>
    <li class="inset">内阴影效果<br/>box-shadow:2px 2px 5px 1px pink inset;</li>
    <li class="multiple-shadow">外阴影模糊效果<br/>box-shadow:0px 0px 5px 3px color ;</li>
</ul>
</body>
</html>
14 背景
背景属性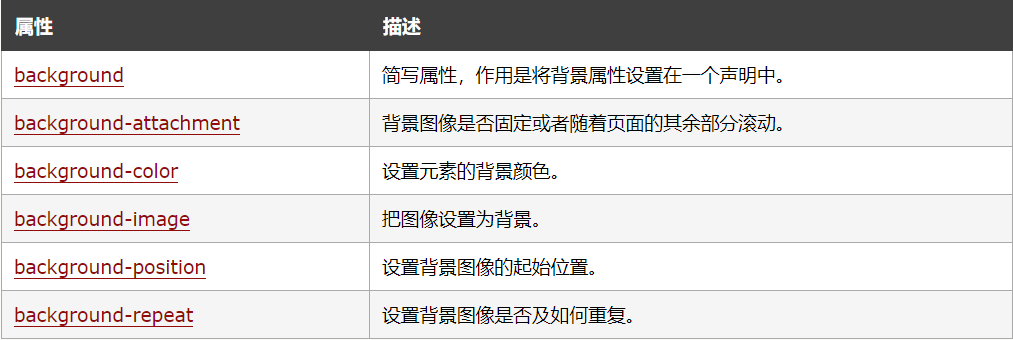
背景色
p {background-color: gray;}
如果您希望背景色从元素中的文本向外延伸,只需增加一些内边距:
p {background-color: gray; padding: 20px;}
背景图像
body {background-image: url("eg.png");}
p{background-image: url("eg.png");}
背景重复
如果需要在页面上对背景图像进行平铺,可以使用 background-repeat 属性。
属性值 repeat 导致图像在水平垂直方向上都平铺,就像以往背景图像的通常做法一样。repeat-x 和 repeat-y 分别导致图像只在水平或垂直方向上重复,no-repeat 则不允许图像在任何方向上平铺。
默认地,背景图像将重复y轴
body
  {
  background-image: url('eg.gif');
  background-repeat: repeat-y;
  }
背景定位
可以利用 background-position 属性改变图像在背景中的位置。
下面的例子在 body 元素中将一个背景图像居中放置:
body
  {
    background-image:url('eg.gif');
    background-repeat:no-repeat;
    background-position:center;
  }
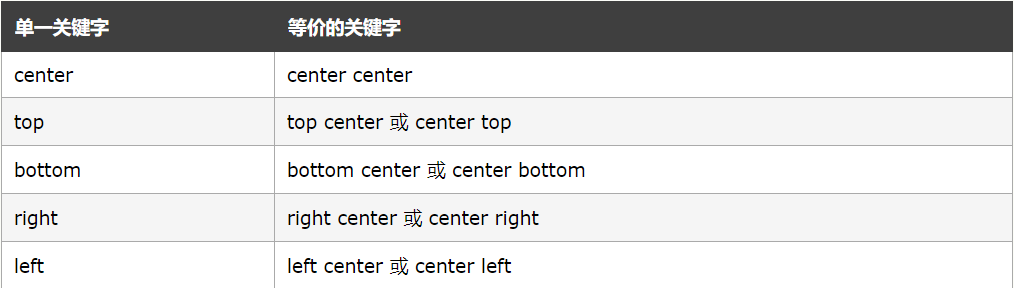
为 background-position 属性提供值有很多方法。首先,可以使用一些关键字:top、bottom、left、right 和 center通常,这些关键字会成对出现,不过也不总是这样。还可以使用长度值,如 100px 或 5cm,最后也可以使用百分数值。不同类型的值对于背景图像的放置稍有差异。
关键字
图像放置关键字最容易理解,其作用如其名称所表明的。例如,top right 使图像放置在元素内边距区的右上角。
如果只出现一个关键字,则认为另一个关键字是 center。
所以,如果希望每个段落的中部上方出现一个图像,只需声明如下:
p{
    background-image:url('bgimg.gif');
    background-repeat:no-repeat;
    background-position:top;
  }
长度值
长度值解释的是元素内边距区左上角的偏移。偏移点是图像的左上角。
比如,如果设置值为 50px 100px,图像的左上角将在元素内边距区左上角向右 50 像素、向下 100 像素的位置上:
body
  {
    background-image:url('eg.gif');
    background-repeat:no-repeat;
    background-position:50px 100px;
  }
背景关联
如果文档比较长,那么当文档向下滚动时,背景图像也会随之滚动。当文档滚动到超过图像的位置时,图像就会消失。
您可以通过 background-attachment 属性防止这种滚动。通过这个属性,可以声明图像相对于可视区是固定的(fixed),因此不会受到滚动的影响:
body
  {
  background-image:url(/i/eg_bg_02.gif);
  background-repeat:no-repeat;
  background-attachment:fixed
  }
background-attachment 属性的默认值是 scroll,也就是说,在默认的情况下,背景会随文档滚动。
15 链接
链接样式的 CSS 属性有很多种(例如 color, font-family, background 等等)
链接的四种状态:
a:link - 未被访问的链接
a:visited - 用户已访问的链接
a:hover - 鼠标指针位于链接的上方
a:active - 链接被点击的时刻
示例:四种状态下的颜色情况
a:link {color:#FF0000;}		/* 未被访问的链接 */
a:visited {color:#00FF00;}	/* 已被访问的链接 */
a:hover {color:#FF00FF;}	/* 鼠标指针移动到链接上 */
a:active {color:#0000FF;}	/* 正在被点击的链接 */
示例:四种状态下的下划线(text-decoration)情况
a:link {text-decoration:none;}
a:visited {text-decoration:none;}
a:hover {text-decoration:underline;}
a:active {text-decoration:underline;}
16 列表
列表属性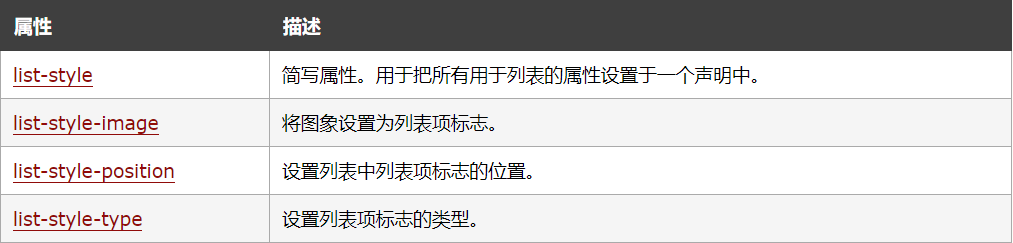
HTML示例
<!DOCTYPE html>
<html lang="en">
<head>
    <meta charset="UTF-8">
    <title>css列表</title>
<link rel="stylesheet" type="text/css"href="style.css">
</head>
<body>
   <ul>
       <li>苹果</li>
       <li>西瓜</li>
       <li>香蕉</li>
   </ul>
</body>
</html>
列表项的标志类型(list-style-type)
ul{
    list-style-type: square    /*方形*/
}
运行结果
列表项图像 (list-style-image)
ul{
     list-style-image: url("dance.gif");
}
运行结果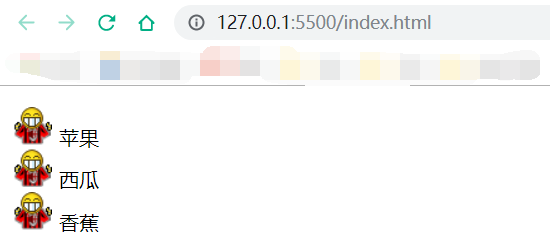
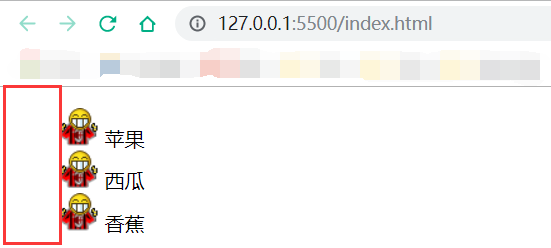
列表项目标记的位置:(list-style-position)
ul
  {
  list-style-position:inside;
  }
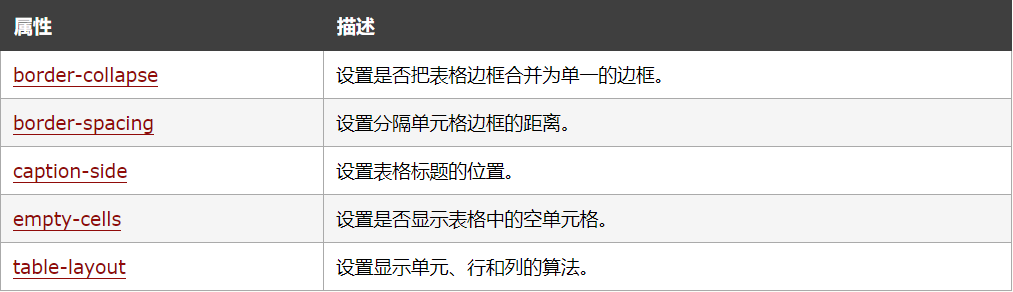
17 表格
示例
<!DOCTYPE html>
<html lang="en">
<head>
<style type="text/css">
    #customers
      {
      font-family:"Trebuchet MS", Arial, Helvetica, sans-serif;
      width:100%;
      border-collapse:collapse;
      }

    #customers td, #customers th
      {
      font-size:1em;
      border:2px solid blue;
      padding:3px 7px 2px 7px;
      }

    #customers th
      {
      font-size:1.1em;
      text-align:left;
      padding-top:5px;
      padding-bottom:4px;
      background-color:#A7C942;
      color:#ffffff;
      }

    #customers tr.alt td
      {
      color:crimson;
      background-color:darksalmon;
      }
</style>
</head>

<body>
<table id="customers">
    <tr>
        <th>Company</th>
        <th>Contact</th>
        <th>Country</th>
    </tr>

    <tr>
        <td>Apple</td>
        <td>Steven Jobs</td>
        <td>USA</td>
    </tr>

    <tr class="alt">
        <td>Baidu</td>
        <td>Li YanHong</td>
        <td>China</td>
    </tr>

    <tr>
        <td>Google</td>
        <td>Larry Page</td>
        <td>USA</td>
    </tr>

    <tr class="alt">
        <td>Lenovo</td>
        <td>Liu Chuanzhi</td>
        <td>China</td>
    </tr>
</table>
</body>
</html>
运行结果:
18 轮廓
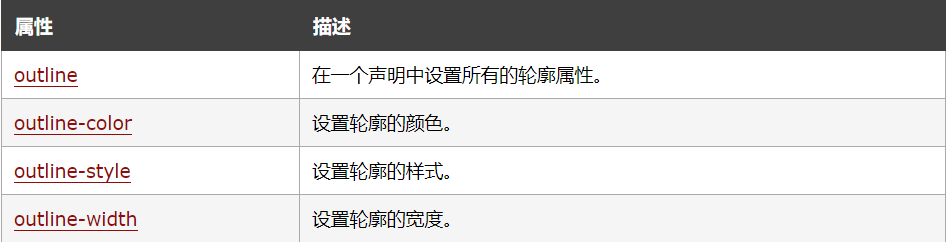
示例:<p>突出效果</p>
p{
    outline-color:red;
    outline-style:groove; /*凹槽形式*/
    outline-width:5px
}
上下效果等同
p{
    outline:red groove 5px;
}
运行结果: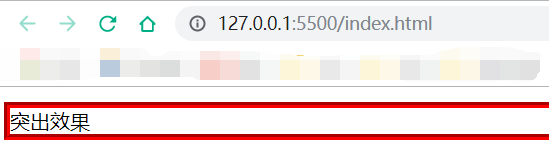
19 盒子模型
所有HTML元素可以看作盒子,它包括:边距,边框,填充,和实际内容。

- Margin(外边距) - 清除边框外的区域,外边距是透明的。
- Border(边框) - 围绕在内边距和内容外的边框。
- Padding(内边距) - 清除内容周围的区域,内边距是透明的。
- Content(内容) - 盒子的内容,显示文本和图像。
当您指定一个元素的宽度和高度属性时,你只是设置了内容区域的宽度和高度。要知道,完全大小的元素,你还必须添加填充,边框和边距。实例
margin详细:https://www.runoob.com/css/css-margin.html
border详细:https://www.runoob.com/css/css-border.html
padding详细:https://www.runoob.com/css/css-padding.html
CSS实例练习
目的
掌握类、标签、ID、元素状态伪类、目标伪类等选择器的使用;
掌握文本、文本阴影、文本对齐;
背景图像、景背颜色、背景定位、边框、边框圆角的设置;
掌握盒子模型、页面宽度自适应控制、对齐方式和浮动定位;
题目
修改Regiser.html文档,创建并链接“mystyle.css”样式表,使用CSS设计页面布局,替换原有表格布局,页面效果需尽可能与图1、2一致,主要要求如下:
(1) 设置页面父容器宽度随浏览器窗口大小自适应改变,但最小不小于400px,最大不大于700px,并且居中显示,设置边框、背景色和字符间距;
(2) 设置默认字体大小为13px,设置标题“注册信息”的大小为默认字体的1.5倍,字体透明,使用三重文本阴影显示(红、蓝、绿),分别使用rgba设置具有一定透明度的阴影颜色;
(3) 页面每一行(对应一类信息)放在一个div中,设置div背景色和圆角边框;
(4) 每一行的提示文本、输入框和右侧辅助信息保持垂直居中对齐,且保障各行间的各同类元素水平对齐;
(5) 姓名和密码输入框中显示背景图像;
(6) 单选按钮和复选按钮被选中时,其后的辅助文本动态变化为红色字体;
(7) 用户单击“返回顶部”时回到页面顶部,并且标题字体变为红色。
(8) 注意:除了表格相关的标签,不能修改其余标签。
| 效果图 | 效果图 |
|---|---|
 |
 |
解答
Regiser.html
<!doctype html>
<html>
    <head>
    <meta charset="utf-8">
    <title>新生报到</title>
    <link href="styles/mystyle.css" rel="stylesheet" type="text/css">

    </head>
    <body>
    <div id="wrapper">
        <h3 id="title" align="center">注 册 信 息</h3>
        <hr noshade size="1" width="99%">
        <form action="" id="form1" autocomplete="on" method="get">
            <div class="info-item"><span class="item-name">姓名:</span>
                <input type="text" class="item-inp" name="user_name" maxlength="10" autofocus required/><span class="star"> *</span>
            </div>

            <div class="info-item"><span class="item-name">学号:</span>
                <input type="text" class="item-inp" name="user_id" required/><span class="star"> *</span>
            </div>

            <div class="info-item"><span class="item-name">密码:</span>
                <input type="password" class="item-inp" name="user_paw"  placeholder="请输入8位密码" required /><span class="star"> *</span>
            </div>

            <div class="info-item"><span class="item-name">性别:</span>
                <div class="item-inp"><label><input type="radio" name="user_sex" value="man"/><span>男</span></label>
                <input type="radio" id="user_sex"  name="user_sex" value="woman" checked/><label for="user_sex">女</label>
                </div>
            </div>

            <div class="info-item"><span class="item-name">身高:</span>
                <input type="number" class="item-inp" name="user_height" min="150" max="190" value="175" step="5" /> 厘米
            </div>

            <div class="info-item"><span class="item-name">体重:</span>
                <input type="range" class="item-inp" name="user_weight" min="45" max="90" value="55" step="2" /> 千克
            </div>

            <div class="info-item"><span class="item-name">出生日期:</span>
                <input type="date"  class="item-inp" name="user_birthday"/>
            </div>

            <div class="info-item"><span class="item-name">电话号码:</span>
                <input type="tel" class="item-inp" name="user_tel" pattern="\d{11}" placeholder="请输入11手机号码"/>
            </div>

            <div class="info-item"><span class="item-name">E-mail:</span>
                <input type="email" class="item-inp" name="user_email"/>
            </div>

            <div class="info-item"><span class="item-name">个人主页:</span>
                <input type="url" class="item-inp" name="user_homepage" autocomplete="off"/>
            </div>

            <div class="info-item"><span class="item-name">家庭住址:</span>
                <select class="item-inp" name="user_address" >
                    <option value="0" >北京</option>
                    <option value="1" >上海</option>
                    <option value="2" selected>成都</option>
                </select>
            </div>

            <div class="info-item"><span class="item-name">邮政编码:</span>
                <input type="text" class="item-inp" name="user_zipcode" pattern="[0-9]{6}" placeholder="请输入6位邮政编码" />
            </div>

            <div class="info-item"><span class="item-name">最爱的颜色:</span>
                    <input type="color" class="item-inp" name="user_color"/>
            </div>

            <div class="info-item"><span class="item-name">喜欢的运动:</span>
                <input type="checkbox" name="user_habit1" value="basketball"/><span>篮球</span>
                <input type="checkbox" name="user_habit2" value="football" checked><span>足球</span>
                <input type="checkbox" name="user_habit3" value="swimming"><span>游泳</span>
            </div>

            <div class="info-item"><span class="item-name">喜欢的网站:</span>
                <input type="url" class="item-inp" name="user_favurl" list="urllist"/>
                <datalist id="urllist" >
                        <option label="百度" value="http://www.baidu.com"/>
                        <option label="新浪" value="http://www.sina.com"/>
                        <option label="谷歌" value="http://www.google.com"/>
                        <option value="http://www.163.com">网易</option>
                </datalist>
            </div>

            <div class="info-item"><span class="item-name">生活照2张:</span>
                <input type="file" class="item-inp" name="user_album"  multiple/>
            </div>

            <div class="info-item"><span class="item-name">个人自述:</span>
                    <textarea name="info" rows="5" cols="50">我是一位特别热爱学习的好孩子。。。</textarea>
            </div>

                <input type="hidden" name="user_secret" value="7"/>

            <div class="info-item" style="text-align:center;">
                    <input type="submit" class="item-bt" value="注册" style="margin-right:100px;"/>   <input type="reset" class="item-bt" value="重置" />
            </div>
                    <hr noshade size="1" width="99%">

                <ul class="info-item">
                        <li><a href="tel:10086">电话</a></li>
                        <li><a href="sms:10086">短信</a></li>
                        <li><a href="mailto:10086@sina.com">E-mail</a></li>
                        <li><a href="#title">返回顶部</a></li>
                </ul>
    </form>
    </div>
    <script>
    </script>
</body>
</html>
mystyle.css
@charset "utf-8";
/* CSS Document */
*{
        font-size:13px;/*题目2*/
    }
a {
text-decoration: none;
}
a:link {
    color: blue;
}
a:visited {
    color: gray;
}
a:hover {
    color: red;
}
a:active {
    color: yellow;
}
#wrapper {/*题目1*/
    width: 95%;
    min-width: 400px;
    max-width: 700px;
    margin: 10px auto;/*上下间隙10px,左右居中*/
    padding-top:5px;/*上内边距*/
    border: 1px solid #ccc;
    background-color: #eee;
    letter-spacing: 0.2em;/*字母间距*/
}

#title {/*题目2*/
    text-align: center;
    color: transparent;
    font-size: 1.5em;
    font-weight: bolder;
    margin: 10px;
    /*border: 1px solid red;*//*设置边框便于布局测试*/
    text-shadow: 0 0 rgba(0,0,255,0.7),
                 -0.1em -0.1em 0.2em rgba(255,0,0,0.5),
                 0.1em 0.1em 0.2em rgba(0,255,0,0.5);
}

.info-item{/*题目3*/
    margin: 10px;
    padding: 3px;
    /*border: 1px solid green;*/
    border-radius: 10px/6px;
    background-color: rgba(204,204,204,0.4);
}
.item-name {/*题目4*/
    width: 32%;
    display: inline-block;/*让块元素保持在一行*/
    text-align: right;
    vertical-align: middle;/*文本和输入域均设置垂直居中对齐*/
}
.item-inp{
    width: 40%;
    box-sizing:border-box;/*否则设置了背景图像的输入域因padding-left而变宽*/
    display: inline-block;
    vertical-align: middle;
    margin-right:0.5em;
}

/*带有背景图像的输入域样式设计*/
/*:nth-child(1)父元素的第一个子元素,也就是第一个info-item所包含的input*/
.info-item:nth-child(1) input{/*题目5*/
    background: url(../images/name.gif) no-repeat;
    background-color: white;/*设置背景图像后,默认的背景色将会是父元素的背景色(如果存在,否则背景色透明)*/
    padding-left: 20px;/*使得content输入区在背景图像右边*/
    border: 1px solid #ccc;/*如果不重定义边框,则会因为背景图像的影响而出现立体边框*/

}
/*第三个info-item所包含的input*/
.info-item:nth-child(3) input {
    background: url(../images/password.gif) no-repeat;
    background-color: white;
    padding-left: 20px; /*增加左内边距来放图标*/
    border: 1px solid #ccc;/*如果不重定义边框,则会因为背景图像的影响而出现立体边框*/
}

input:checked+span,input:checked+label {/*设置被选中的单选按钮和复选框后的文字的颜色*/
    color: red;/*题目6*/
}
textarea{
    width:60%;
    vertical-align:middle;
}

/*设置导航链接的样式*/
ul, li {
    box-sizing: border-box;
    border-radius: 10px/6px;
    background-color: rgba(204,204,204,0.4);
}
ul {
    list-style: none;
    text-align:center;
}
li {
    width: 22%;
    display:inline-block;
}
li:nth-child(odd):hover {
    transition: transform 1s ease-in-out;
    transform: scale(1.2) rotate(-15deg);
}
li:nth-child(even):hover {
    transition: transform 1s ease-in-out;
    transform: scale(1.2) skew(30deg);
}

.star{color:#F00;}

#title:target{/*返回顶部时改变title字体颜色*/
    color:red;/*题目7*/
}
HTML&CSS实例练习
目的
掌握viewport视口;
掌握ul-li列表结构的应用;
掌握dl-dt-dd定义列表结构的应用;
掌握弹性盒布局。
题目
设计某浪移动版网站首页的体育板块,页面效果如图1、2所示。
(1) 设置页面视区宽度为设备宽,初始缩放比例为1.0,允许用户最大缩放比例为1.5,最小为0.8;
(2) 分别使用ul-li结构设计首行“体育 中超、英超、NBA”文本导航链接和“国足、西甲、欧冠、CBA、亚冠”图片导航链接,在两行导航间插入水平线用于分隔;
(3) 文本导航链接使用浮动定位,图片导航链接采用弹性盒布局,每个列表项中的图片宽度自适应变化,限制最大宽度70个像素;
(4) 从第三行开始插入多条新闻主题,包括图片、标题和评论数和评论图标链接,每一条新闻采用dl-dt-dd标签结构来设计,每一个dl标签的高度为80个像素,请使用弹性盒布局来设计,隐藏图片溢出部分,评论数和评论图标垂直居中对齐。
(5) 在多条新闻之后插入“展开更多”导航及其图标,要求图标和文字垂直居中对齐;
(6) 注意页面中不同文本的字体设置,使用em单位,并设置新闻中标题为1.5倍行距;
(7) 盒布局中采用box-flex设置各元素大小自适应,要求页面能够适应不同屏幕宽度的设备,如图1和图2所示。
| 效果图 | 效果图 |
|---|---|
 |
 |
解答
<!doctype html>
<html>
<head>
<meta charset="utf-8">
<meta name="viewport" content="width=device-width, initial-scale=1.0,maximum-scale=1.2, minimum-scale=0.8"><!--题目1-->
<title>某浪体育</title>
<style>
/*设置默认样式*/
* {
    font-size: 14px;
}
#sports{
    width:95%;
    min-width:410px;
    margin: 10px auto;
}
ul {
    list-style: none;
    margin: 0;
    padding: 0;
}
/*题目3*/
/*设置首行文本导航样式,采用浮动定位*/
.tit_list {
    padding: 0;
    color:#06C;
}

.tit_list li {
    margin:5px;
    float: right;
}

.tit_list li:first-child {
    font-weight: bolder;
    font-size: 1.2em;
    float: left;
}
/*题目3*/
/*设置图片导航样式,采用弹性盒布局*/
.nav_items {
    /*margin: 10px auto;*/
    display: -webkit-box;
    display: box;
    /*border:1px dashed red;*/
}

.nav_items li {
    text-align: center;
    -webkit-box-flex:1;
    /*border:1px dashed red;*/
}

.nav_items li img{ width:90%; max-width:70px;}/*根据列表项宽度缩小图片*/
/*题目4*/
/*设置新闻链接样式,采用弹性盒布局*/
dl {
    height:80px;
    display: -webkit-box;
    display: box;
    -webkit-box-pack:justify;
    overflow: hidden;/*隐藏图片溢出部分*/
    /*border:1px dashed red;*/
}

dt {
    width:1%;/*避免bug*/
    margin-left:2%;
    -webkit-box-flex:4;
    overflow: hidden;
    /*border:1px dashed red;*/
}
dd {
    width:1%;
    margin-left:5%;
    margin-right:2%;
    -webkit-box-flex:6;
    display: -webkit-box;
    display: box;
    -webkit-box-orient:vertical;
    /*border:1px dashed red;*/
}
dd h4 {/*题目6*/
    font-size: 1.1em;
    font-weight:lighter;
    line-height: 1.5em;/* 1.5倍行距 */
    margin: 0;
    -webkit-box-flex:6;
}

dd div {
    -webkit-box-flex:1;
    text-align:right;
}
dd span{
    font-size: 0.7em;
}
/*设置评论图片与评论数垂直对齐方式*/
img {
    vertical-align: middle;
}
</style>
</head>

<body>
    <section id="sports">
        <ul class="tit_list"><!--题目2-->
            <li>体育</li>
            <li>NBA</li>
            <li>英超</li>
            <li>中超</li>
        </ul>
        <hr width="98%" color="#CCCCCC" noshade><!--题目2-->
        <ul class="nav_items"><!--题目2-->
            <li>
                <div><img src="images/guozu.jpg"></div>
                <div>国足</div>
            </li>
            <li>
                <div><img src="images/xijia.png"></div>
                <div>西甲</div>
            </li>
            <li>
                <div><img src="images/ouguan.jpg"></div>
                <div>欧冠</div>
            </li>
            <li>
                <div><img src="images/cba.jpg"></div>
                <div>CBA</div>
            </li>
            <li>
                <div><img src="images/yaguan.jpg"></div>
                <div>亚冠</div>
            </li>
        </ul>
        <hr width="98%" color="#CCCCCC" noshade>
        <dl ><!--题目4-->
            <dt><img src="images/1.jpg"/></dt>
            <dd>
                <h4>游泳冠军赛孙杨1500自夺冠 豪取五金圆满收官</h4>
                <div><span> 578 <img src="images/timg.jpg"/></span> </div>
            </dd>
        </dl>
        <hr width="98%" color="#CCCCCC" noshade>
        <dl>
            <dt><img src="images/2.jpg"/></dt>
            <dd>
                <h4>游泳冠军赛刘湘50自折桂 徐嘉余收获第四金</h4>
                <div><span> 8 <img src="images/timg.jpg"/></span></div>
            </dd>
        </dl>
        <hr width="98%" color="#CCCCCC" noshade>
        <dl>
            <dt><img src="images/3.jpg"/></dt>
            <dd >
                <h4 >被称中国台北队 台湾急了:台湾不是中国大陆一部分</h4>
                <div><span> 4174 <img src="images/timg.jpg"/></span> </div>
            </dd>
        </dl>
        <hr width="98%" color="#CCCCCC" noshade>
        <dl>
            <dt><img src="images/4.jpg"/></dt>
            <dd>
                <h4 >中超-扎哈维2球雷鸟肖智建功 富力4-1辽足返榜首</h4>
                <div ><span> 1万 <img src="images/timg.jpg"/></span> </div>
            </dd>
        </dl>
        <hr width="98%" color="#CCCCCC" noshade>
        <dl>
            <dt><img src="images/5.jpg"/></dt>
            <dd>
                <h4>曝齐达内铁定留皇马!没冠军也执教 获主席力挺</h4>
                <div><span> 658 <img src="images/timg.jpg"/></span> </div>
            </dd>
        </dl>
        <hr width="98%" color="#CCCCCC" noshade><!--题目5-->
        <div style="text-align:center; color:#06C;">展开更多 <img src="images/xiala.jpg"/></div>
    </section>
</body>
</html>
JavaScript
JavaScript是一种属于网络的脚本语言,已经被广泛用于Web应用开发,常用来为网页添加各式各样的动态功能,为用户提供更流畅美观的浏览效果。
用法
HTML 中的脚本必须位于 <script> 与 </script> 标签之间。
内嵌脚本:
<script>标签放置在 HTML 页面的 <body>或 <head> 部分中。
<head>
<script language="javascript">
    alert("我的第一个 JavaScript");
</script>
</head>
链接外部js脚本:
<script src="js/welcome.js" type="text/javascript"> </script>
函数
function abs(x) {
    if (x >= 0) {
        return x;
    } else {
        return -x;
    }
}
上述abs()函数的定义如下:
function指出这是一个函数定义;abs是函数的名称;(x)括号内列出函数的参数,多个参数以,分隔;{ ... }之间的代码是函数体,可以包含若干语句,甚至可以没有任何语句。
BOM
浏览器对象模型(Browser Object Model)提供了用户与浏览器对象之间交互和操作的接口。在BOM中,对象之间存在层次关系,window为顶层对象,所有其它对象都是window的子对象。
BOM 主要对象
window: BOM的核心,顶层对象,负责与浏览器交互的操作
document: 代表浏览器载入的文档(如HTML文件)
navigator: 包含浏览器信息(HTML5新增geolocation属性)
history: 包含浏览窗口访问过的URL
location: 包含当前文档URL的信息
screen: 包含客户端屏幕信息(移动设备特别需要)
**本地存储:**localStorage和sessionStorage(HTML5新增)
**离线应用:**(HTML5新增)
Window 对象
打开、关闭、调整窗口
window.open();//打开空白窗口

window.open('http://www.baidu.html');

window.close();//关闭窗口
警告、确认、输入对话框
| 方法 | 描述 |
|---|---|
| alert() | 显示带有一段消息和一个确认按钮的警告框。 |
| confirm() | 显示带有一段消息以及确认按钮和取消按钮的对话框。 |
| prompt() | 显示可提示用户输入的对话框,并返回用户输入信息。 |
altert(text)
<script>
    alert("测试一哈");
</script>
confirm(text)
<script>
    var r=confirm("Press a button");
      if (r==true)
            alert("You pressed OK!");
      else
         alert("You pressed Cancel!") ;
</script>
prompt(text,default)
<!DOCTYPE html>
<html>
<head>

    <meta http-equiv="Content-Type" content="text/html; charset=GBK" />
    <title> 输入对话框 </title>
</head>
<body>
    你的名字是:<span id="name"></span>
    <script type="text/javascript">
        name = prompt("请输入你的名字:","简简");
        document.getElementById("name").innerHTML = name;
    </script>
</body>
</html>
document 对象
| 属性 | 描述 |
|---|---|
| body | 返回 元素 |
| forms | 返回所有表单元素对象,可当成数组来使用 |
| cookie | 设置或返回与当前文档有关的所有 cookie。 |
| domain | 返回当前文档的域名。 |
| lastModified | 返回文档被最后修改的日期和时间。 |
| referrer | 返回载入当前文档的文档的 URL。 |
| title | 返回当前文档的标题。 |
| URL | 返回当前文档的 URL。 |
| readyState | 返回文档的(加载)状态 |
| documentElement | 返回文档根节点, |
| images | 返回所有Image对象, |
<script>
    alert(document.cookie);
    write(document.URL);
</script>;
document.forms的用法
| 代码 | 作用 |
|---|---|
| document.forms | 表示获取当前页面的所有表单 |
| document.forms[0] | 表示获取当前页面的第一个表单 |
| document.forms[‘user_form’] | 表示获取当前页面的name=”user_form”的表单 |
| document.forms[0].submit() | 表示提交第一个form表单 提交到form里面的 action指向的地方 |
document 对象方法
| 方法 | 描述 |
|---|---|
| close() | 关闭用 document.open() 方法打开的输出流,并显示选定的数据。 |
| getElementById() | 返回对拥有指定 id 的第一个对象的引用。 |
| getElementsByName() | 返回带有指定名称的对象集合。 |
| getElementsByTagName() | 返回带有指定标签名的对象集合。 |
| open() | 打开一个流,以收集来自任何 document.write() 或 document.writeln() 方法的输出。 |
| write() | 向文档写 HTML 表达式 或 JavaScript 代码。 |
| writeln() | 等同于 write() 方法,不同的是在每个表达式之后写一个换行符。 |
<script>
    var a=1,b=2;
    document.write("<h1>a+b</h1>");
    document.write("=");
    document.writeln(a+b);
</script>
location 对象
| 属性 | 描述 |
|---|---|
| location.hash | 设置或返回从井号 (#) 开始的 URL(锚)。 |
| location.host | 设置或返回主机名和当前 URL 的端口号。 |
| location.hostname | 设置或返回当前 URL 的主机名。 |
| location.href | 设置或返回完整的 URL。 |
| location.pathname | 设置或返回当前 URL 的路径部分。 |
| location.port | 设置或返回当前 URL 的端口号。 |
| location.protocol | 设置或返回当前 URL 的协议。 |
| location.search | 设置或返回从问号 (?) 开始的 URL(查询部分)。 |
<script type="text/javascript">
    var loc = window.location;
    var locStr = "当前的location信息是:\n";
    // 遍历location对象的全部属性
    for (var propname in loc)
    {
        locStr += propname + ": " + loc[propname] + "\n"
    }
    alert(locStr);
</script>
| 方法 | 描述 |
|---|---|
| assign() | 加载新的文档。 |
| reload() | 重新加载当前文档。 |
| replace() | 用新的文档替换当前文档。 |
<!doctype html>
<html>
<head>
<title>location对象</title>
</head>
<body>
<div id="typeMachine" onclick = "clcFun()">戳我啊</div>
<script>
    function clcFun () {
        document.write(location.href);//打印出当前地址
        //window.location.reload();//重新加载html文档
        //window.location.href="http://www.baidu.com"//打开网页,方式1
        //window.location.assign("http://www.baidu.com");//打开网页,方式2
        //window.location.replace("http://www.baidu.com");//打开网页,方式3
    }
</script>
</body>
</html>
History 对象
| 属性、方法 | 描述 |
|---|---|
| length | 返回浏览器历史列表中的 URL 数量。 |
| back() | 加载 history 列表中的前一个 URL。 |
| forward() | 加载 history 列表中的下一个 URL。 |
| go() | 加载 history 列表中的某个具体页面。 |
Navigator 对象
| 属性 | 描述 |
|---|---|
| appCodeName | 返回浏览器的代码名。 |
| appMinorVersion | 返回浏览器的次级版本。 |
| appName | 返回浏览器的名称。 |
| appVersion | 返回浏览器的平台和版本信息。 |
| browserLanguage | 返回当前浏览器的语言。 |
| cookieEnabled | 返回指明浏览器中是否启用 cookie 的布尔值。 |
| cpuClass | 返回浏览器系统的 CPU 等级。 |
| onLine | 返回指明系统是否处于脱机模式的布尔值。 |
| platform | 返回运行浏览器的操作系统平台。 |
| systemLanguage | 返回 OS 使用的默认语言。 |
| userAgent | 返回由客户机发送服务器的 user-agent 头部的值。 |
| userLanguage | 返回 OS 的自然语言设置。 |
Navigator 对象方法
| 方法 | 描述 |
|---|---|
| javaEnabled() | 规定浏览器是否启用 Java。 |
| taintEnabled() | 规定浏览器是否启用数据污点 (data tainting)。 |
Screen 对象
| 属性 | 描述 |
|---|---|
| availHeight | 返回显示屏幕的高度 (除 Windows 任务栏之外)。 |
| availWidth | 返回显示屏幕的宽度 (除 Windows 任务栏之外)。 |
| bufferDepth | 设置或返回调色板的比特深度。 |
| colorDepth | 返回目标设备或缓冲器上的调色板的比特深度。 |
| deviceXDPI | 返回显示屏幕的每英寸水平点数。 |
| deviceYDPI | 返回显示屏幕的每英寸垂直点数。 |
| fontSmoothingEnabled | 返回用户是否在显示控制面板中启用了字体平滑。 |
| height | 返回显示屏幕的高度。 |
| logicalXDPI | 返回显示屏幕每英寸的水平方向的常规点数。 |
| logicalYDPI | 返回显示屏幕每英寸的垂直方向的常规点数。 |
| pixelDepth | 返回显示屏幕的颜色分辨率(比特每像素)。 |
| updateInterval | 设置或返回屏幕的刷新率。 |
| width | 返回显示器屏幕的宽度。 |
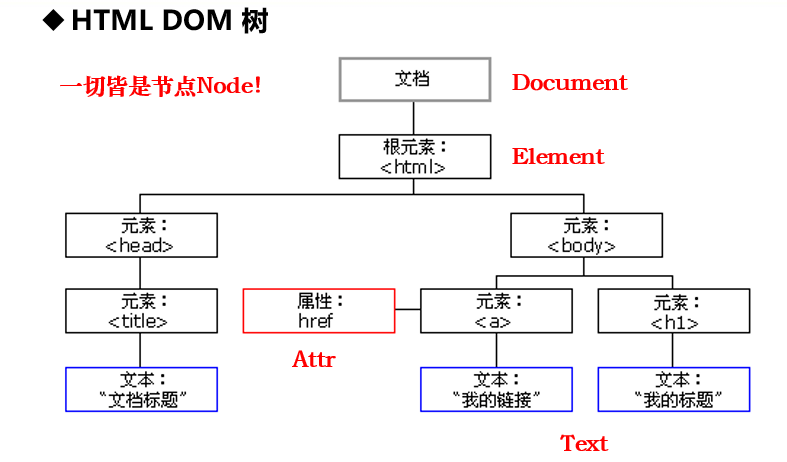
DOM
Document Object Model简称DOM,采取直观、一致的方式对结构化文档(HTML、XML)进行模型化处理,形成一棵结构化的文档树。
每个HTML文档被加载后都会在内存中初始化一个document对象,该对象存放整个网页HTML内容,从该对象中可获取页面任何元素,包括表单的各种信息。
DOM为常用的HTML元素提供了一套完整的接口/类体系。从页面的document对象到每个常用的HTML元素,DOM模型都提供了对应的接口/类,每个接口/类都提供了相应的方法来操作DOM元素本身、属性及其子元素。
DOM Event 对象
| 属性 | 此事件发生在何时… |
|---|---|
| onabort | 图像的加载被中断。 |
| onblur | 元素失去焦点。 |
| onchange | 当元素获取焦点,且值发生改变时触发。 |
| onclick | 当用户点击某个对象时调用的事件句柄。 |
| ondblclick | 当用户双击某个对象时调用的事件句柄。 |
| onerror | 在加载文档或图像时发生错误。 |
| onfocus | 元素获得焦点。 |
| onkeydown | 某个键盘按键被按下。 |
| onkeypress | 某个键盘按键被按下并松开。 |
| onkeyup | 某个键盘按键被松开。 |
| onload | 一张页面或一幅图像完成加载。 |
| onmousedown | 鼠标按钮被按下。 |
| onmousemove | 鼠标被移动。 |
| onmouseout | 鼠标从某元素移开。 |
| onmouseover | 鼠标移到某元素之上。 |
| onmouseup | 鼠标按键被松开。 |
| onreset | 重置按钮被点击。 |
| onresize | 窗口或框架被重新调整大小。 |
| onselect | 文本被选中。 |
| onsubmit | 确认按钮被点击。 |
| onunload | 用户退出页面。 |
JavaScript String 对象
| 方法 | 描述 |
|---|---|
| anchor() | 创建 HTML 锚。 |
| big() | 用大号字体显示字符串。 |
| blink() | 显示闪动字符串。 |
| bold() | 使用粗体显示字符串。 |
| charAt() | 返回在指定位置的字符。 |
| charCodeAt() | 返回在指定的位置的字符的 Unicode 编码。 |
| concat() | 连接字符串。 |
| fixed() | 以打字机文本显示字符串。 |
| fontcolor() | 使用指定的颜色来显示字符串。 |
| fontsize() | 使用指定的尺寸来显示字符串。 |
| fromCharCode() | 从字符编码创建一个字符串。 |
| indexOf() | 检索字符串。 |
| italics() | 使用斜体显示字符串。 |
| lastIndexOf() | 从后向前搜索字符串。 |
| link() | 将字符串显示为链接。 |
| localeCompare() | 用本地特定的顺序来比较两个字符串。 |
| match() | 找到一个或多个正则表达式的匹配。 |
| replace() | 替换与正则表达式匹配的子串。 |
| search() | 检索与正则表达式相匹配的值。 |
| slice() | 提取字符串的片断,并在新的字符串中返回被提取的部分。 |
| small() | 使用小字号来显示字符串。 |
| split() | 把字符串分割为字符串数组。 |
| strike() | 使用删除线来显示字符串。 |
| sub() | 把字符串显示为下标。 |
| substr() | 从起始索引号提取字符串中指定数目的字符。 |
| substring() | 提取字符串中两个指定的索引号之间的字符。 |
| sup() | 把字符串显示为上标。 |
| toLocaleLowerCase() | 把字符串转换为小写。 |
| toLocaleUpperCase() | 把字符串转换为大写。 |
| toLowerCase() | 把字符串转换为小写。 |
| toUpperCase() | 把字符串转换为大写。 |
| toSource() | 代表对象的源代码。 |
| toString() | 返回字符串。 |
| trim() | 去除字符串两边的空空格 |
| valueOf() | 返回某个字符串对象的原始值。 |
indexOf() 方法可返回某个指定的字符串值在字符串中首次出现的位置。
lastIndexOf() 方法可返回一个指定的字符串值最后出现的位置,在一个字符串中的指定位置从后向前搜索。
trim() 方法用于删除字符串的头尾空格。
JavaScript RegExp 对象
| 方法 | 描述 |
|---|---|
| compile | 编译正则表达式。 |
| exec | 检索字符串中指定的值。返回找到的值,并确定其位置。 |
| test | 检索字符串中指定的值。返回 true 或 false。 |
test() 方法用于检测一个字符串是否匹配某个模式.
RegExpObject.test(string)
if(!(/^[1][3,4,5,7,8][0-9]{9}$/).test(tel))
        alert("手机号格式错误!");

if(!(/^[1][3,4,5,7,8]\d{9}$/).test(tel))
        alert("手机号格式错误!");
表达式的意思是:
1–以1为开头;
2–第二位可为3,4,5,7,8,中的任意一位;
3–[0-9]的数 \d代表数字
4–9次[0-9]
获得HTML元素节点
为动态地修改HTML页面,首先需要获得HTML元素对象。
•通过HTML标签的id属性:
  var xEle=document.getElementById(“xElement”);
   没有则返回null
•通过表单的name属性:
var nodeinp=document.form[0].user_name;
•通过CSS选择器:
var node=document.querySelector(“#myColor_1”);
   //返回一个node节点
修改HTML元素
包括修改节点的内容、属性和CSS样式
| 属性 | 说明 |
|---|---|
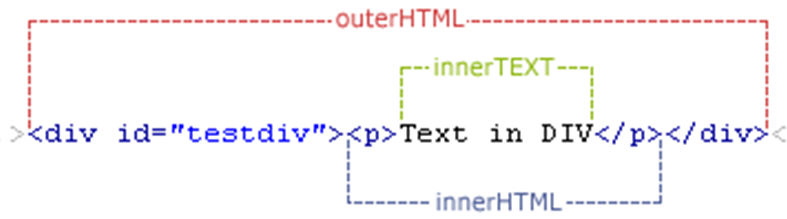
| innerHTML | 设置或获取位于对象起始和结束标签内的 HTML |
| outerHTML | 设置或获取对象及其内容的 HTML 形式 |
| innerText | 设置或获取位于对象起始和结束标签内的文本 |
| outerText | 设置(包括标签)或获取(不包括标签)对象的文本 |
| value | 设置或获取表单元素的value属性值 |
| options[index] | 设置或获取表单中列表、下拉菜单的选项内容 |
| className | 修改HTML元素的CSS样式 |
| style | 修改HTML元素的内联CSS样式 |
修改HTML元素–内容
<!doctype html>
<html>
<head>
<meta charset="utf-8">
<meta http-equiv="Content-Type" content="text/html; charset=UTF-8">
<title>innerHTML、outerHTML和innerText、outerHTML的区别</title>

</head>
<body>
     <ul>
      <li id="test_id1" onclick="innerHTMLDemo()">innerHTML效果.</li>
      <li id="test_id2" onclick="innerTextDemo()">innerText效果.</li>
      <li id="test_id3" onclick="outerHTMLDemo()">outerHTML效果.</li>
      <li id="test_id4" onclick="outerTextDemo()">outerText效果.</li>
     </ul>

    <script language="JavaScript" type="text/javascript">
  //.innerHTML
  function innerHTMLDemo()
  {
   test_id1.innerHTML="<i><u>设置或获取位于对象起始和结束标签内的 HTML.</u></i>";
  }
      //.innerText
  function innerTextDemo()
  {
   test_id2.innerText="<i><u>设置或获取位于对象起始和结束标签内的文本.</u></i>";
  }
      //.outerHTML
  function outerHTMLDemo()
  {
       test_id3.outerHTML="<font size=9pt color=red><i><u>设置或获取对象及其内容的 HTML 形式.</u></i></font>";
  }
      //.outerText
  function outerTextDemo()
   {
   test_id4.outerText="<br></br><i><u>设置(包括标签)或获取(不包括标签)对象的文本.</u></i>";
  }
 </script>
</body>
</html>
JavaScript实例练习
目的
掌握JavaScript脚本的调用和基本语法;
掌握JavaScript常用内置对象的基本应用;
掌握BOM和window消息对话框的使用;
掌握HTML DOM动态网页设计技术。
题目
为Register.html编写JavaScript脚本文件,采用链接方式调用,实现如下功能:
(1) 当用户填写非空白用户名、学号和密码后,将输入域后的星号变为灰色,当用户清除输入域时,将星号变为灰色,见图1;
(2) 当用户单击“注册”按钮时,读取用户的姓名、学号、性别、住址和爱好信息,然后使用确认消息对话框显示这些信息,并提示用户是否继续提交,见图2;
如果继续,则对表单数据做如下检验、处理和提示(见图3):
(3) 检验用户名不能为空,清除用户名两端多余空格,最后向服务器提交去掉空格后的用户名;
(4) 密码必须为8位,且两次输入密码相同;
(5) 电话号码必须位11位数字;
(6) 邮件地址中必须包含且只包含一个“@”符号,并且“@”不能是地址第一和最后一个字符。
| 效果图 | 效果图 |
|---|---|
 |
  |
 |
 |
解答
Register.html
<!doctype html>
<html>
    <head>
    <meta charset="utf-8">
    <title>新生报到</title>
    <link href="style/Register.css" rel="stylesheet" type="text/css">
    <script src="js/Register.js"></script>
    </head>
    <body>
    <div id="wrapper">
        <h3 id="title" align="center">注 册 信 息</h3>
        <hr noshade size="1" width="99%">
        <form action="" name="regForm" id="regForm" autocomplete="on" method="get">
            <div class="info-item"><span class="item-name">姓名:</span>
                <input type="text" class="item-inp" name="user_name" maxlength="10" autofocus required onChange="changeStatus(this)"/><span class="star"> *</span>
            </div>

            <div class="info-item"><span class="item-name">学号:</span>
                <input type="text" class="item-inp" name="user_id" required onChange="changeStatus(this)"/><span class="star"> *</span>
            </div>

            <div class="info-item"><span class="item-name">密码:</span>
                <input type="password" class="item-inp" name="user_pwd1"  placeholder="请输入8位密码" required onChange="changeStatus(this)"/><span class="star"> *</span>
            </div>

            <div class="info-item"><span class="item-name">确认密码:</span>
                <input type="password" class="item-inp" name="user_pwd2"  placeholder="请输入相同的密码" required onChange="changeStatus(this)"/><span class="star"> *</span>
            </div>

            <div class="info-item"><span class="item-name">性别:</span>
                <div class="item-inp"><label><input type="radio" name="user_sex" value="男"/><span>男</span></label>
                <input type="radio" id="user_sex"  name="user_sex" value="女" checked/><label for="user_sex">女</label>
                </div>
            </div>

            <div class="info-item"><span class="item-name">身高:</span>
                <input type="number" class="item-inp" name="user_height" min="150" max="190" value="175" step="5" /> 厘米
            </div>

            <div class="info-item"><span class="item-name">体重:</span>
                <input type="range" class="item-inp" name="user_weight" min="45" max="90" value="55" step="2" /> 千克
            </div>

            <div class="info-item"><span class="item-name">出生日期:</span>
                <input type="date"  class="item-inp" name="user_birthday"/>
            </div>

            <div class="info-item"><span class="item-name">电话号码:</span>
                <input type="tel" class="item-inp" name="user_tel" pattern="\d{11}" placeholder="请输入11手机号码"/>
            </div>

            <div class="info-item"><span class="item-name">E-mail:</span>
                <input type="email" class="item-inp" name="user_email"/>
            </div>

            <div class="info-item"><span class="item-name">个人主页:</span>
                <input type="url" class="item-inp" name="user_homepage" autocomplete="off"/>
            </div>

            <div class="info-item"><span class="item-name">家庭住址:</span>
                <select class="item-inp" name="user_address" >
                    <option value="0" >北京</option>
                    <option value="1" >上海</option>
                    <option value="2" selected>成都</option>
                </select>
            </div>

            <div class="info-item"><span class="item-name">邮政编码:</span>
                <input type="text" class="item-inp" name="user_zipcode" pattern="[0-9]{6}" placeholder="请输入6位邮政编码" />
            </div>

            <div class="info-item"><span class="item-name">最爱的颜色:</span>
                    <input type="color" class="item-inp" name="user_color"/>
            </div>

            <div class="info-item"><span class="item-name">喜欢的运动:</span>
                <input type="checkbox" name="user_habit" value="篮球"/><span>篮球</span>
                <input type="checkbox" name="user_habit" value="足球" checked><span>足球</span>
                <input type="checkbox" name="user_habit" value="游泳"><span>游泳</span>
            </div>

            <div class="info-item"><span class="item-name">喜欢的网站:</span>
                <input type="url" class="item-inp" name="user_favurl" list="urllist"/>
                <datalist id="urllist" >
                        <option label="百度" value="http://www.baidu.com"/>
                        <option label="新浪" value="http://www.sina.com"/>
                        <option label="谷歌" value="http://www.google.com"/>
                        <option value="http://www.163.com">网易</option>
                </datalist>
            </div>

            <div class="info-item"><span class="item-name">生活照2张:</span>
                <input type="file" class="item-inp" name="user_album"  multiple/>
            </div>

            <div class="info-item"><span class="item-name">个人自述:</span>
                    <textarea name="info" rows="5" cols="50">我是一位特别热爱学习的好孩子。。。</textarea>
            </div>

                <input type="hidden" name="user_secret" value="7"/>

            <div class="info-item" style="text-align:center;">
                    <input type="button" class="item-bt" value="注册" onClick="validate()" style="margin-right:100px;"/>   <input type="reset" class="item-bt" value="重置" />
            </div>
                    <hr noshade size="1" width="99%">

                <ul class="info-item">
                        <li><a href="tel:10086">电话</a></li>
                        <li><a href="sms:10086">短信</a></li>
                        <li><a href="mailto:10086@sina.com">E-mail</a></li>
                        <li><a href="#title">返回顶部</a></li>
                </ul>
    </form>
    </div>
</body>
</html>
Register.css
@charset "utf-8";
*{
        font-size:13px;
    }
a {
text-decoration: none;
}
a:link {
    color: blue;
}
a:visited {
    color: gray;
}
a:hover {
    color: red;
}
a:active {
    color: yellow;
}
#wrapper {
    width: 95%;
    min-width: 400px;
    max-width: 700px;
    margin: 10px auto;
    padding-top:5px;
    border: 1px solid #ccc;
    background-color: #eee;
    letter-spacing: 0.2em;
}

#title {
    text-align: center;
    color: transparent;
    font-size: 1.5em;
    font-weight: bolder;
    margin: 10px;
    /*border: 1px solid red;*//*设置边框便于布局测试*/
    text-shadow: 0 0 rgba(0,0,255,0.7),
                 -0.1em -0.1em 0.2em rgba(255,0,0,0.5),
                 0.1em 0.1em 0.2em rgba(0,255,0,0.5);
}
#title:target{/*返回顶部时改变title字体颜色*/
    color:red;
}

.info-item{
    margin: 10px;
    padding: 3px;
    /*border: 1px solid green;*/
    border-radius: 10px/6px;
    background-color: rgba(204,204,204,0.4);
}
.item-name {
    width: 32%;
    display: inline-block;
    text-align: right;
    vertical-align: middle;/*文本和输入域均设置垂直居中对齐*/
}
.item-inp{
    width: 40%;
    box-sizing:border-box;/*否则设置了背景图像的输入域因padding-left而变宽*/
    display: inline-block;
    vertical-align: middle;
    margin-right:0.5em;
}

/*带有背景图像的输入域样式设计*/
.info-item:nth-child(1) input{
    background: url(../image/name.gif) no-repeat;
    background-color: white;/*设置背景图像后,默认的背景色将会是父元素的背景色(如果存在,否则背景色透明)*/
    padding-left: 20px;/*使得content输入区在背景图像右边*/
    border: 1px solid #ccc;/*如果不重定义边框,则会因为背景图像的影响而出现立体边框*/

}
.info-item input[type="password"] {
    background: url(../image/password.gif) no-repeat;
    background-color: white;
    padding-left: 20px;
    border: 1px solid #ccc;/*如果不重定义边框,则会因为背景图像的影响而出现立体边框*/
}

input:checked+span,input:checked+label {/*设置被选中的单选按钮和复选框后的文字的颜色*/
    color: red;
}
textarea{
    width:60%;
    vertical-align:middle;
}

/*设置导航链接的样式*/

ul, li {
    box-sizing: border-box;
    border-radius: 10px/6px;
    background-color: rgba(204,204,204,0.4);
}
ul {
    list-style: none;
    text-align:center;
}
li {
    width: 22%;
    display:inline-block;
}
li:nth-child(odd):hover {
    transition: transform 1s ease-in-out;
    transform: scale(1.2) rotate(-15deg);
}
li:nth-child(even):hover {
    transition: transform 1s ease-in-out;
    transform: scale(1.2) skew(30deg);
}

.star{color:#F00;}
Register.js
function changeStatus(obj){
    //方法一:通过节点关系
    /*if(obj.value!=null&&obj.value.trim()!="")//不全为空格时
                obj.nextSibling.style.color="#333";
            else
                obj.nextSibling.style.color="#F00";*/

    //方法二:通过节点列表及两类节点的对应关系
    var objs = document.getElementsByClassName("item-inp");
    var stars = document.querySelectorAll(".star");
    for(var i=0;i<4;i++){
        obj = objs[i];
        if(obj.value!=null&&obj.value.trim()!="")
            stars[i].style.color="#333";
        else
            stars[i].style.color="#F00";
    }
}
function validate(){
    var allinfos = "";

    var user_name=document.forms[0].user_name.value.trim();//
    allinfos+="姓名:"+user_name+"\n";//加换行
    var user_id=document.forms[0].user_id.value.trim();//
    allinfos+="学号:"+user_id+"\n";//加换行
    var user_sex = document.regForm.user_sex.value.trim();
    allinfos+="性别:"+user_sex+"\n";//加换行
    var user_address = document.regForm.user_address;
    allinfos+="住址:"+user_address.options[user_address.selectedIndex].innerText+"\n";
    var user_habit = document.regForm.user_habit;
    allinfos+="爱好:";
    for (var i = 0; i < user_habit.length; i++) {
        if (user_habit[i].checked) {
            allinfos+=user_habit[i].value+ "、";
        }
    }
    allinfos = allinfos.substring(0,allinfos.length-1);//删除最后一个空格字符
    //document.regForm.info.value = allinfos;
    var resp = window.confirm(allinfos+"\n\n请核对以上信息是否正确?\n\n单击'确定'继续,否则取消");

    if(resp==false) return;


    var user_pwd1=document.forms[0].user_pwd1.value.trim();
    var user_pwd2=document.forms[0].user_pwd2.value.trim();
    var user_tel=document.forms[0].user_tel.value.trim();
    var user_email=document.forms[0].user_email.value.trim();

    document.forms[0].user_name.value = user_name;//向服务器提交去掉空格后的用户名

    if(user_name.length<=0)
        alert("用户名不能为空!");
    else if(user_pwd1.length<8)
        alert("密码长度必须为8位!");
    else if(user_pwd2=="")
        alert("请输入确认密码!");
    else if(user_pwd1!=user_pwd2)
        alert("两次密码不一致!");
    else  if(user_tel.length!=11)
        alert("手机号必须为11位!");
    else  if(!checkNum(user_tel))
        alert("手机号必须为数字!");
    else if(user_email.indexOf("@")<1||user_email.indexOf("@")==user_email.length-1||user_email.indexOf("@")!=user_email.lastIndexOf("@"))
        alert("邮件格式不正确!");
    else
        document.forms[0].submit();
}

function checkNum(num){//检测电话号码的每一位是否是数字字符,方法一
    var isNum = true;
    for(i=0;i<num.length;i++)
    {
        if(isNaN(num.charAt(i)))
        {
            isNum = false;
            break;
        }
    }
    return isNum;
}

function checkNum2(num){//检测电话号码的每一位是否是数字字符,方法二
    var isNum = false;
    for(i=0;i<num.length;i++)
    {
        if(num.charAt(i)-'0' >=0 && num.charAt(i)-'0' <=9)
        {
            isNum = true;
        }
        else
            isNum = false;
    }
    return isNum;
}
一些实用例子
透明效果
style="background-color:rgba(0,0,0,0);"
页面滚动到指定位置
<!DOCTYPE html>
<head>
<meta http-equiv="Content-Type" content="text/html; charset=utf-8" />
<title>js平滑滚动到顶部、底部、指定地方</title>
<script type="text/javascript" src="http://cdn.staticfile.org/jquery/2.1.1-rc2/jquery.min.js"></script>
<style>
 .box{ height:200px; width:100%; background:#ccc; margin:10px 0;}
 .location{ position:fixed; right:0; bottom:10px; width:20px; background:#FFC; padding:5px; cursor:pointer;color:#003};
</style>
</head>
<body>
<div class="box"></div>
<div class="box"></div>
<div class="box"></div>
<div class="box"></div>
<div class="box a">产品介绍产品介绍产品介绍产品介绍产品介绍产品介绍产品介绍产品介绍产品介绍产品介绍产品介绍产品介绍产品介绍</div>
<div class="box"></div>
<div class="box"></div>
<div class="box"></div>
<div class="box"></div>
<div class="box bottom"></div>
<div class="location">
  <p class="scroll_top">返回顶部</p>
  <p class="scroll_a">产品介绍</p>
  <p class="scroll_bottom">滑到底部</p>
</div>
<script type="text/javascript">
 jQuery(document).ready(function($){
  $('.scroll_top').click(function(){$('html,body').animate({scrollTop: '0px'}, 800);});
  $('.scroll_a').click(function(){$('html,body').animate({scrollTop:$('.a').offset().top}, 800);});
  $('.scroll_bottom').click(function(){$('html,body').animate({scrollTop:$('.bottom').offset().top}, 800);});
 });
</script>
</body>
</html>